Odin AI Chats provide an intuitive way to interact with AI agents, enabling you to generate highly contextualized responses tailored to your needs. Instead of a one-size-fits-all assistant, Chats lets you select from different pre-configured agents, each specialized for tasks such as data analysis, document summarization, content generation, image creation, or web research. By combining flexible agent selection with features like file uploads, Knowledge Base integration, and contextual chat memory, Chats ensure that responses are both relevant and actionable. Depending on the agent and language model you configured for it, you can:Documentation Index
Fetch the complete documentation index at: https://learn.getodin.ai/llms.txt
Use this file to discover all available pages before exploring further.
- Analyze structured or unstructured data
- Summarize and interact with documents in real time
- Retrieve fresh insights from the web via Google search
- Generate creative text or images
Chat Features
- Agent Selection: Choose from a variety of pre-configured agents tailored to different tasks and use cases.
- File Uploads: Upload documents or images directly into the chat for analysis (see Chat with Documents for more details).
- Knowledge Base Integration: Interact with documents and data stored in your Knowledge Base for more informed responses.
- Contextual Responses: Agents can provide responses based on the context of your previous messages in the chat.
- Export Responses: Export AI responses for further use or sharing.
Navigating the Chat Interface
The chat interface is designed to be user-friendly and intuitive. Here are the key components of the interface:Chat Management
Create, rename, or delete chats from the chat list on the left side of the interface.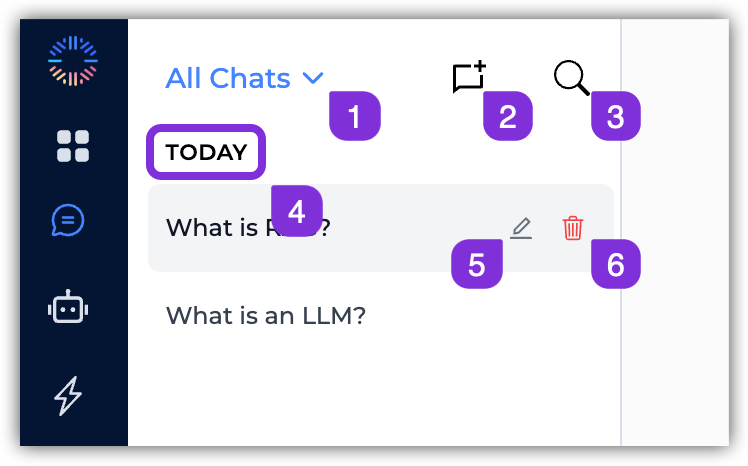
- All Chats Dropdown – Filter chats by All Chats or My Chats, to see all shared interactions, or just the ones you created.
- New Chat – Click this button to start a new chat session.
- Search – Use the search bar to quickly find specific chats by name or content.
- Chat History – View and manage your previous chat sessions, categorized as Today, Yesterday, This Week, and Older.
- Rename Chat – Click the pencil icon next to the chat name to rename the chat.
- Delete Chat – Click the trash icon to delete the chat permanently.
Chat Interface
The main chat area where you interact with the selected agent.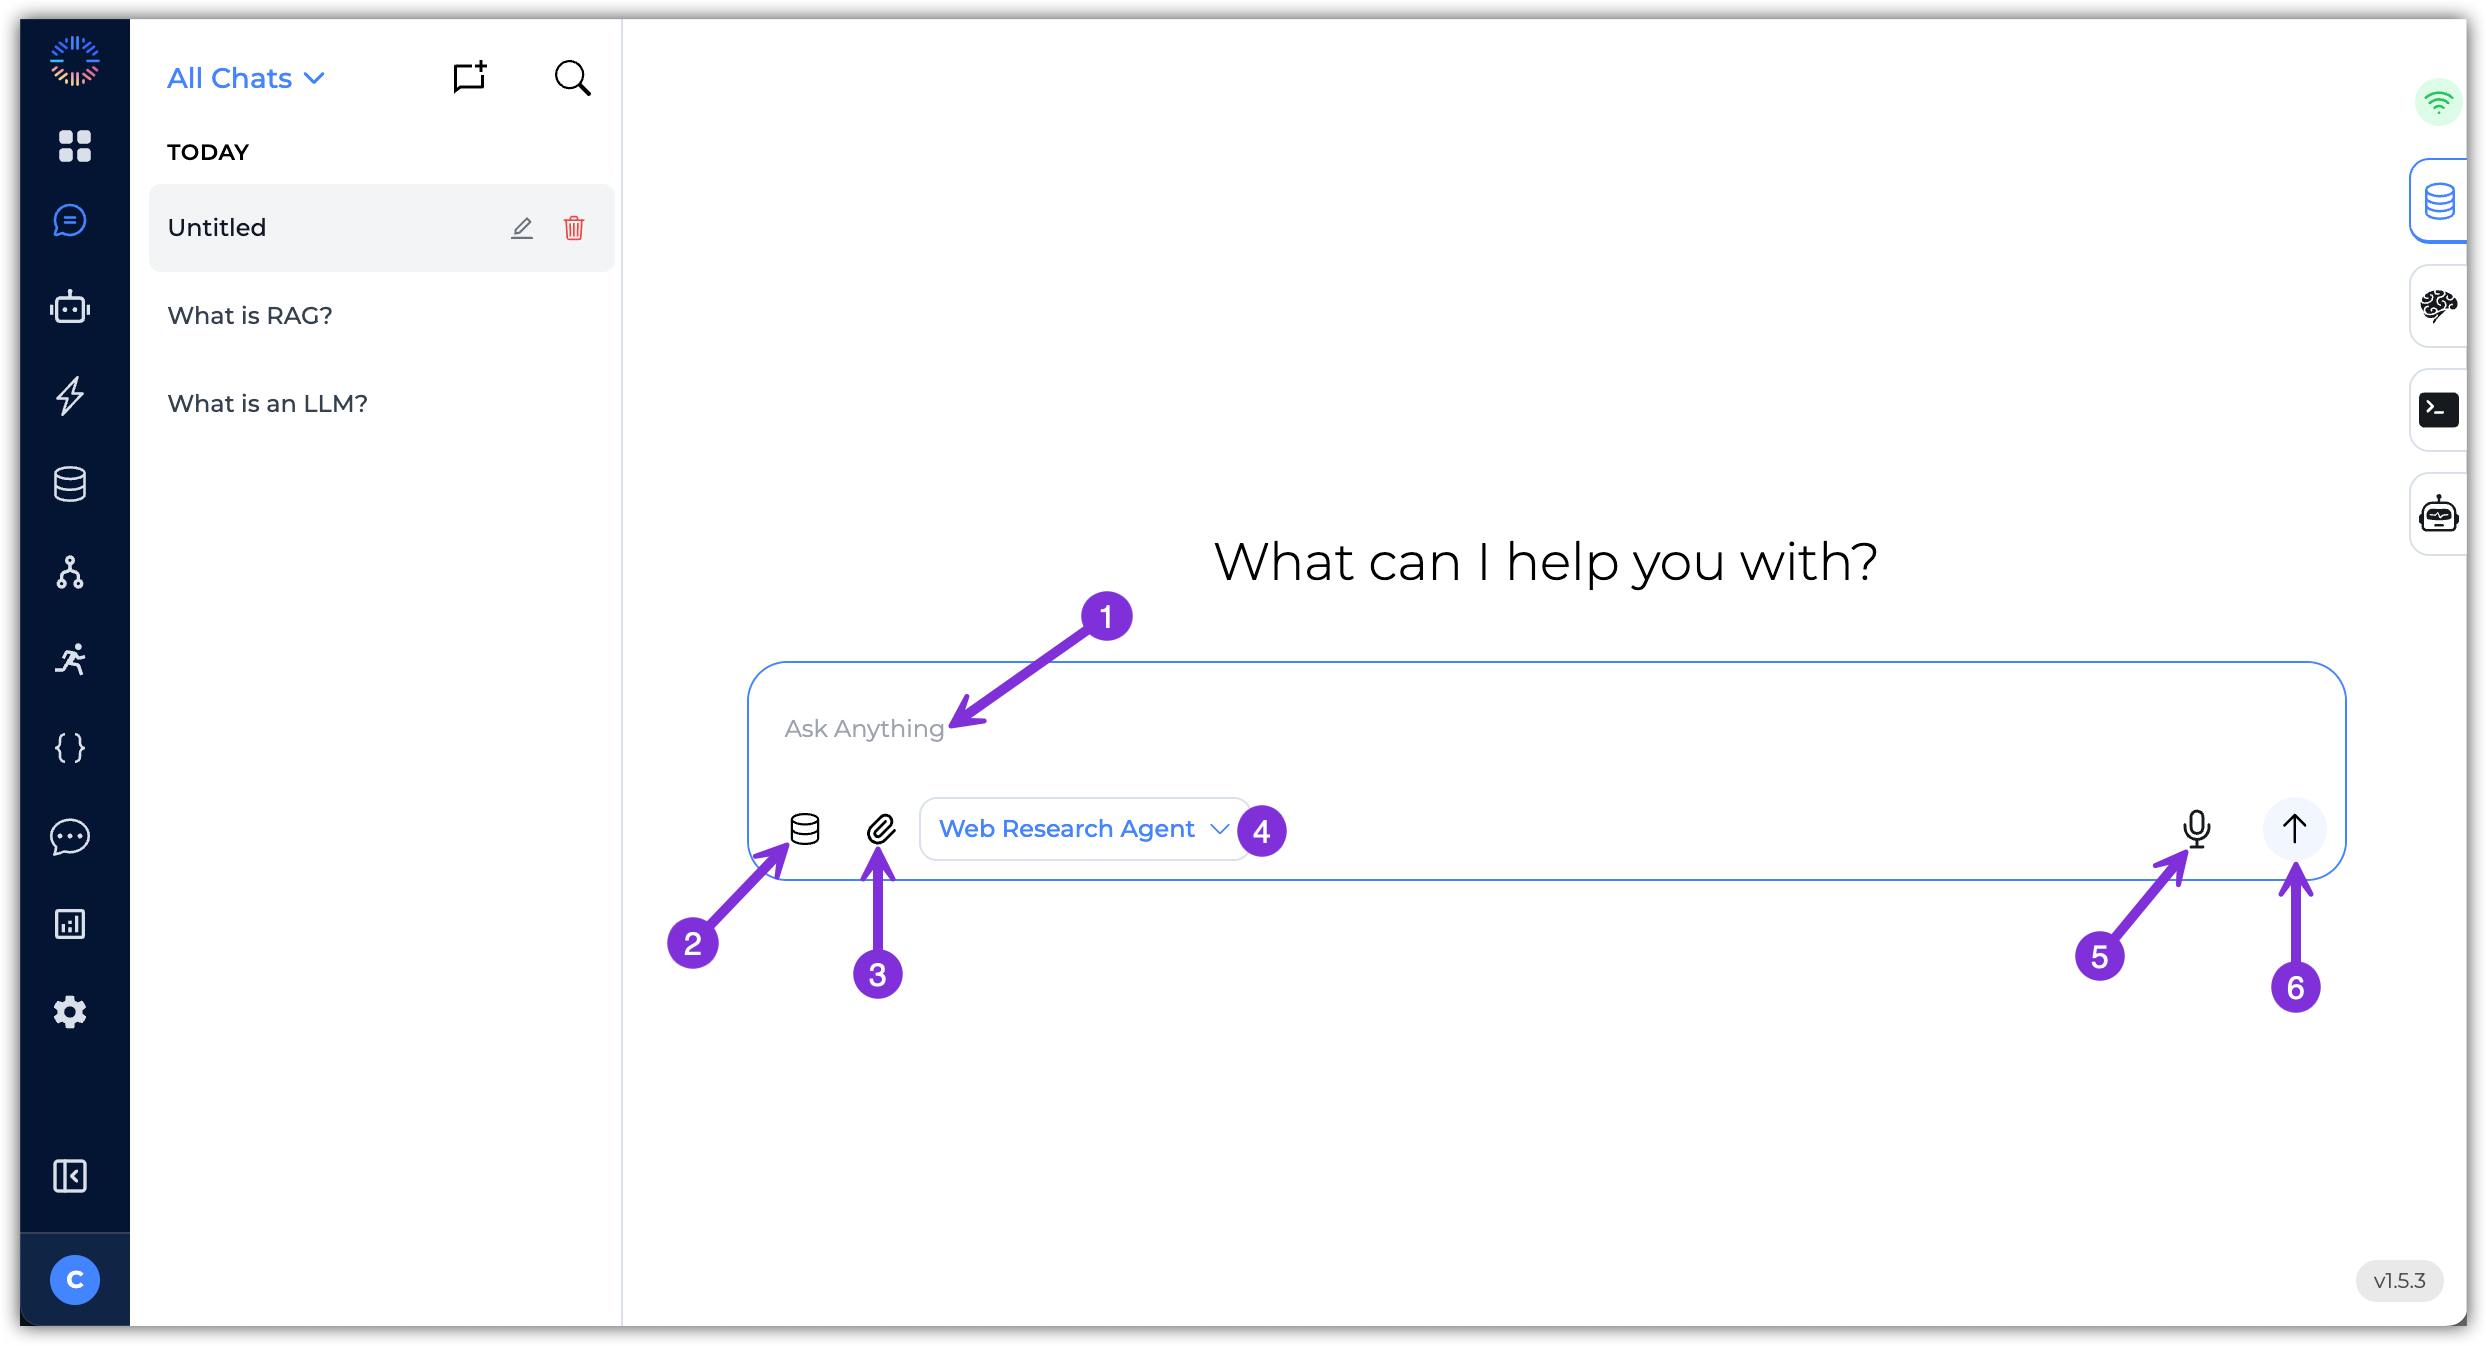
- Message Input Box – Type your messages or queries here.
- Document Selection – You can select documents from your Knowledge Base to provide context for the chat.
- File Attachment – Click the paperclip icon to upload files directly into the chat for analysis.Supported file types include text documents, PDFs, images, and more.
- Agent Dropdown – Select the AI agent you’ve pre-configured that you want to interact with from the dropdown menu.
- Voice Input – Click the microphone icon to use voice input for your messages.
- Send Button – Click the send button or press
Enterto submit your message
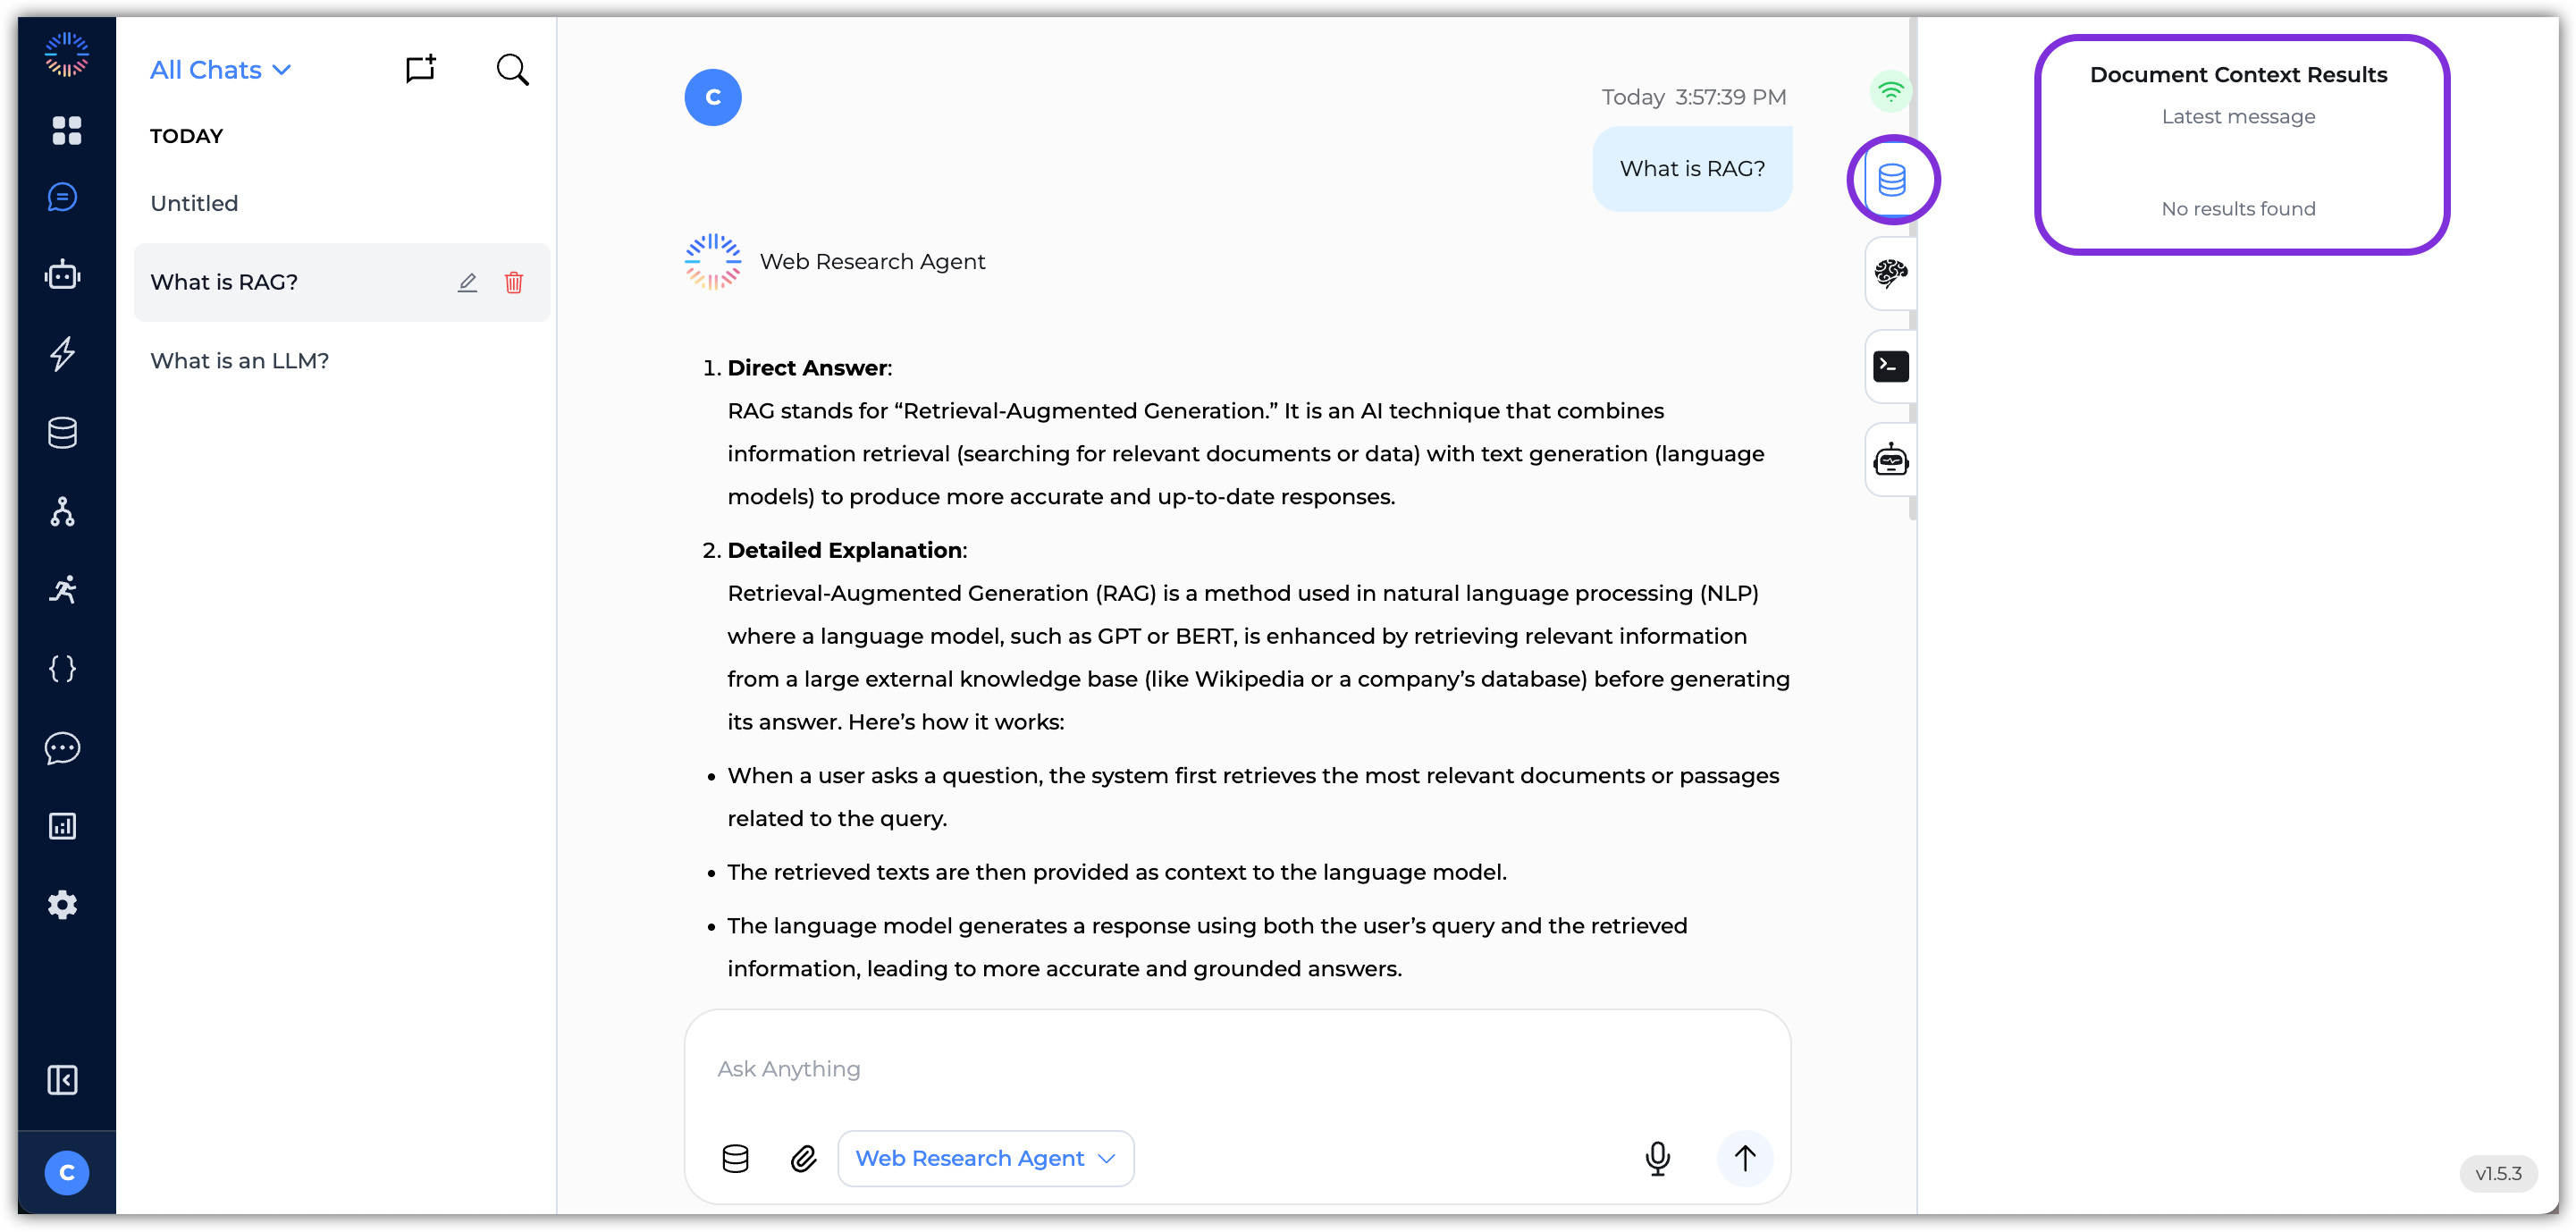
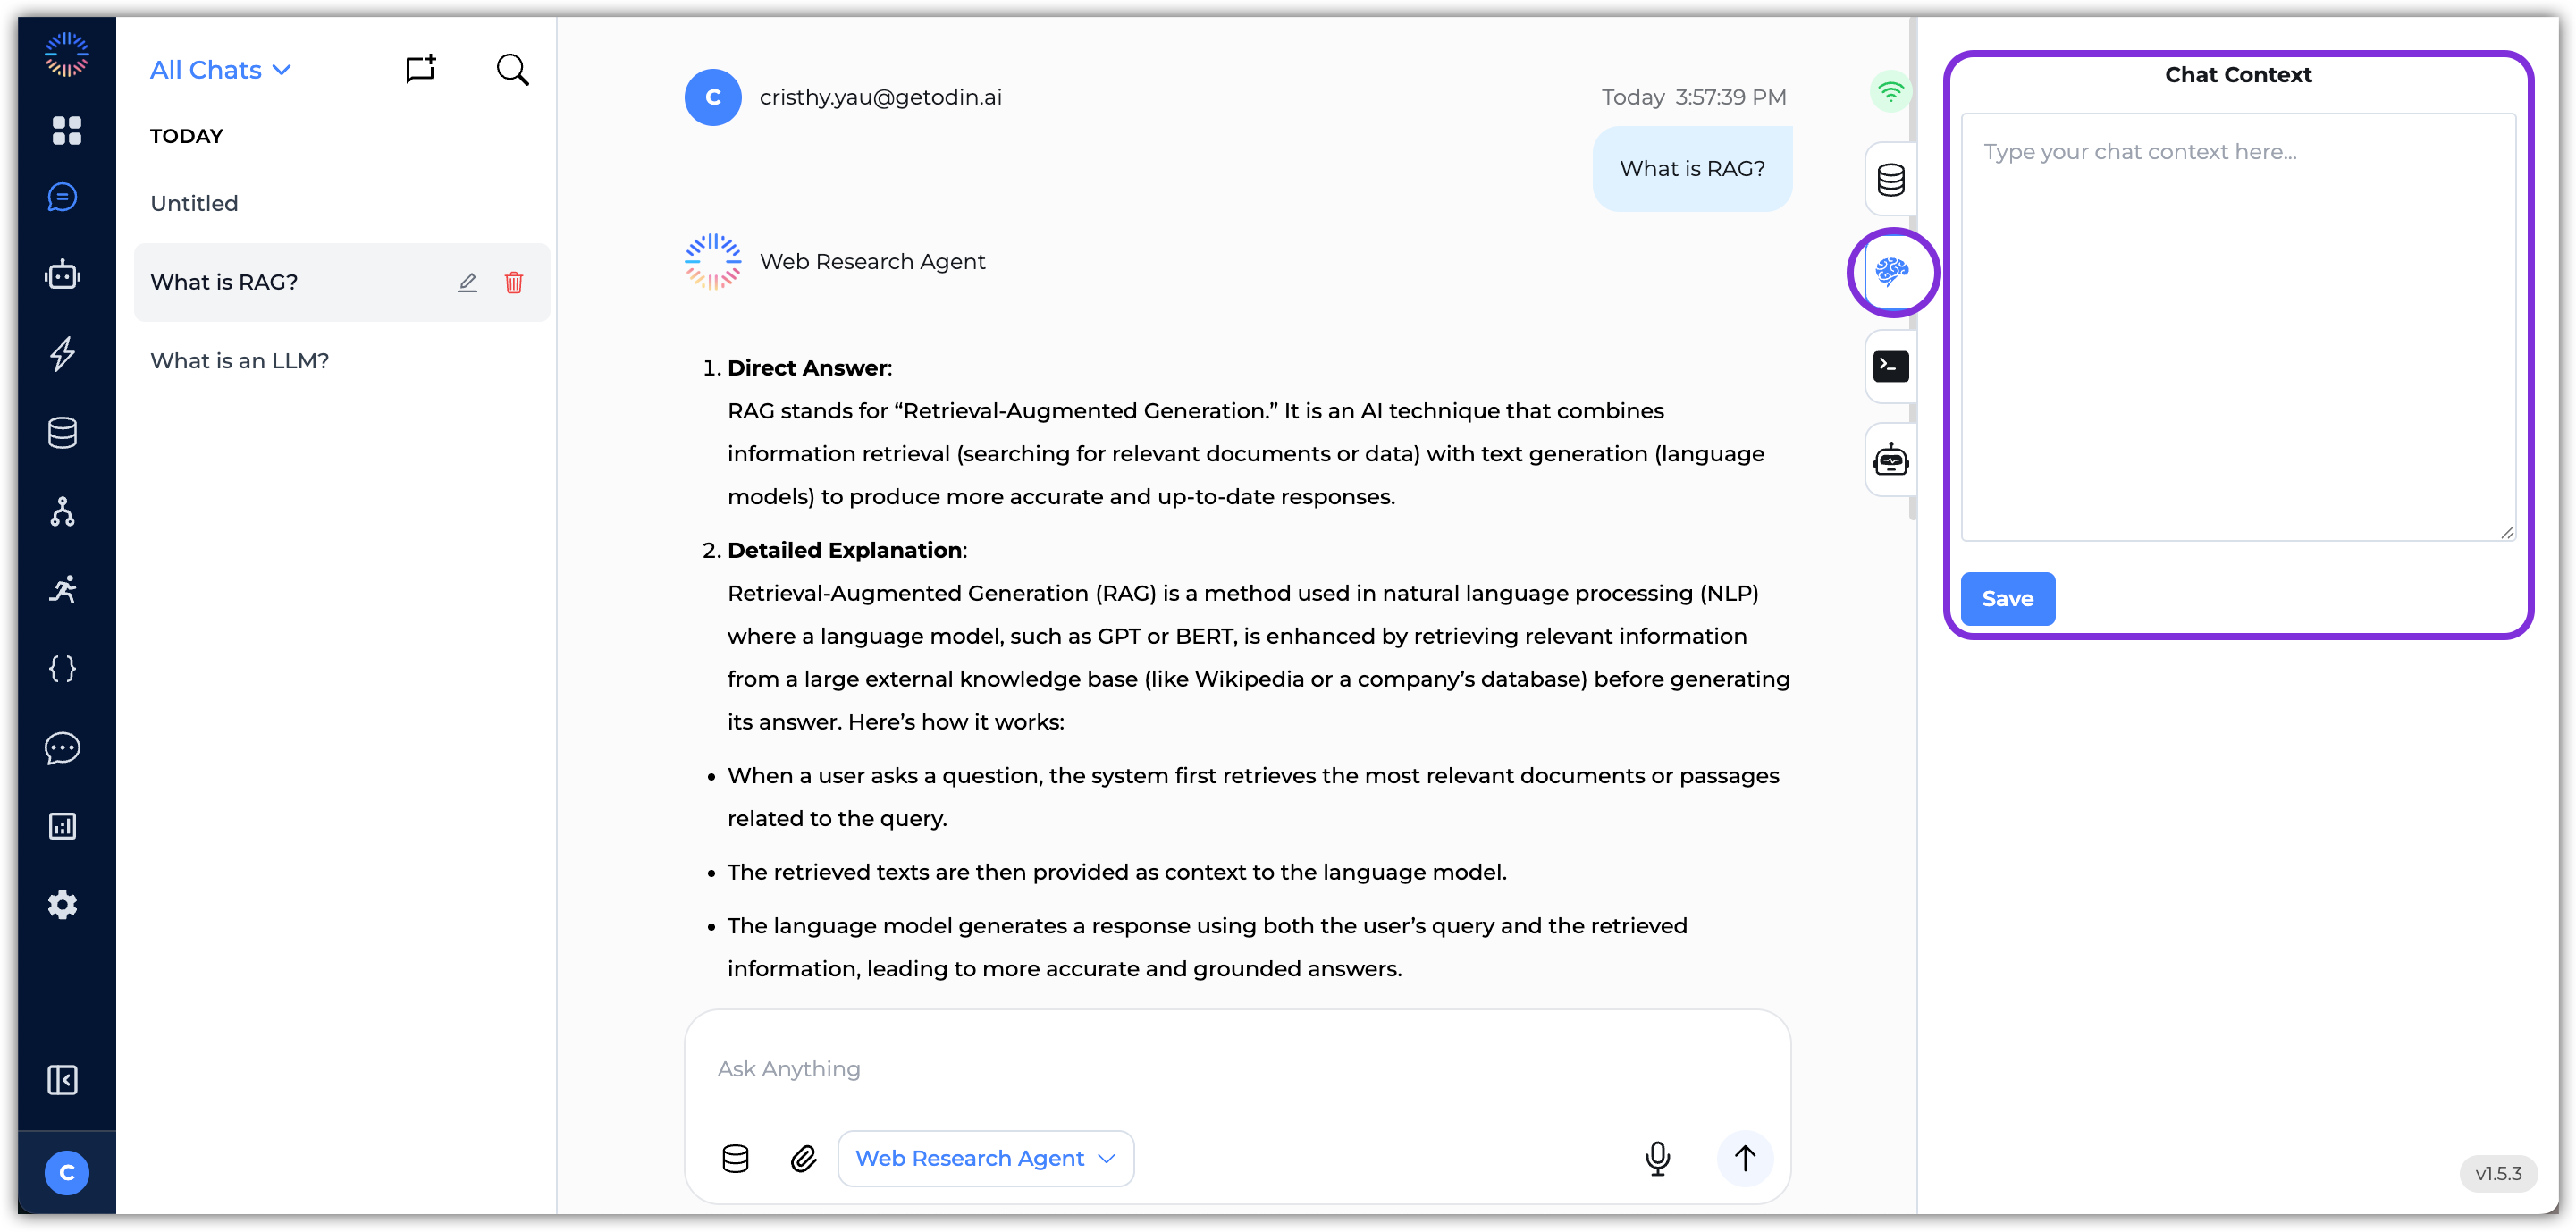
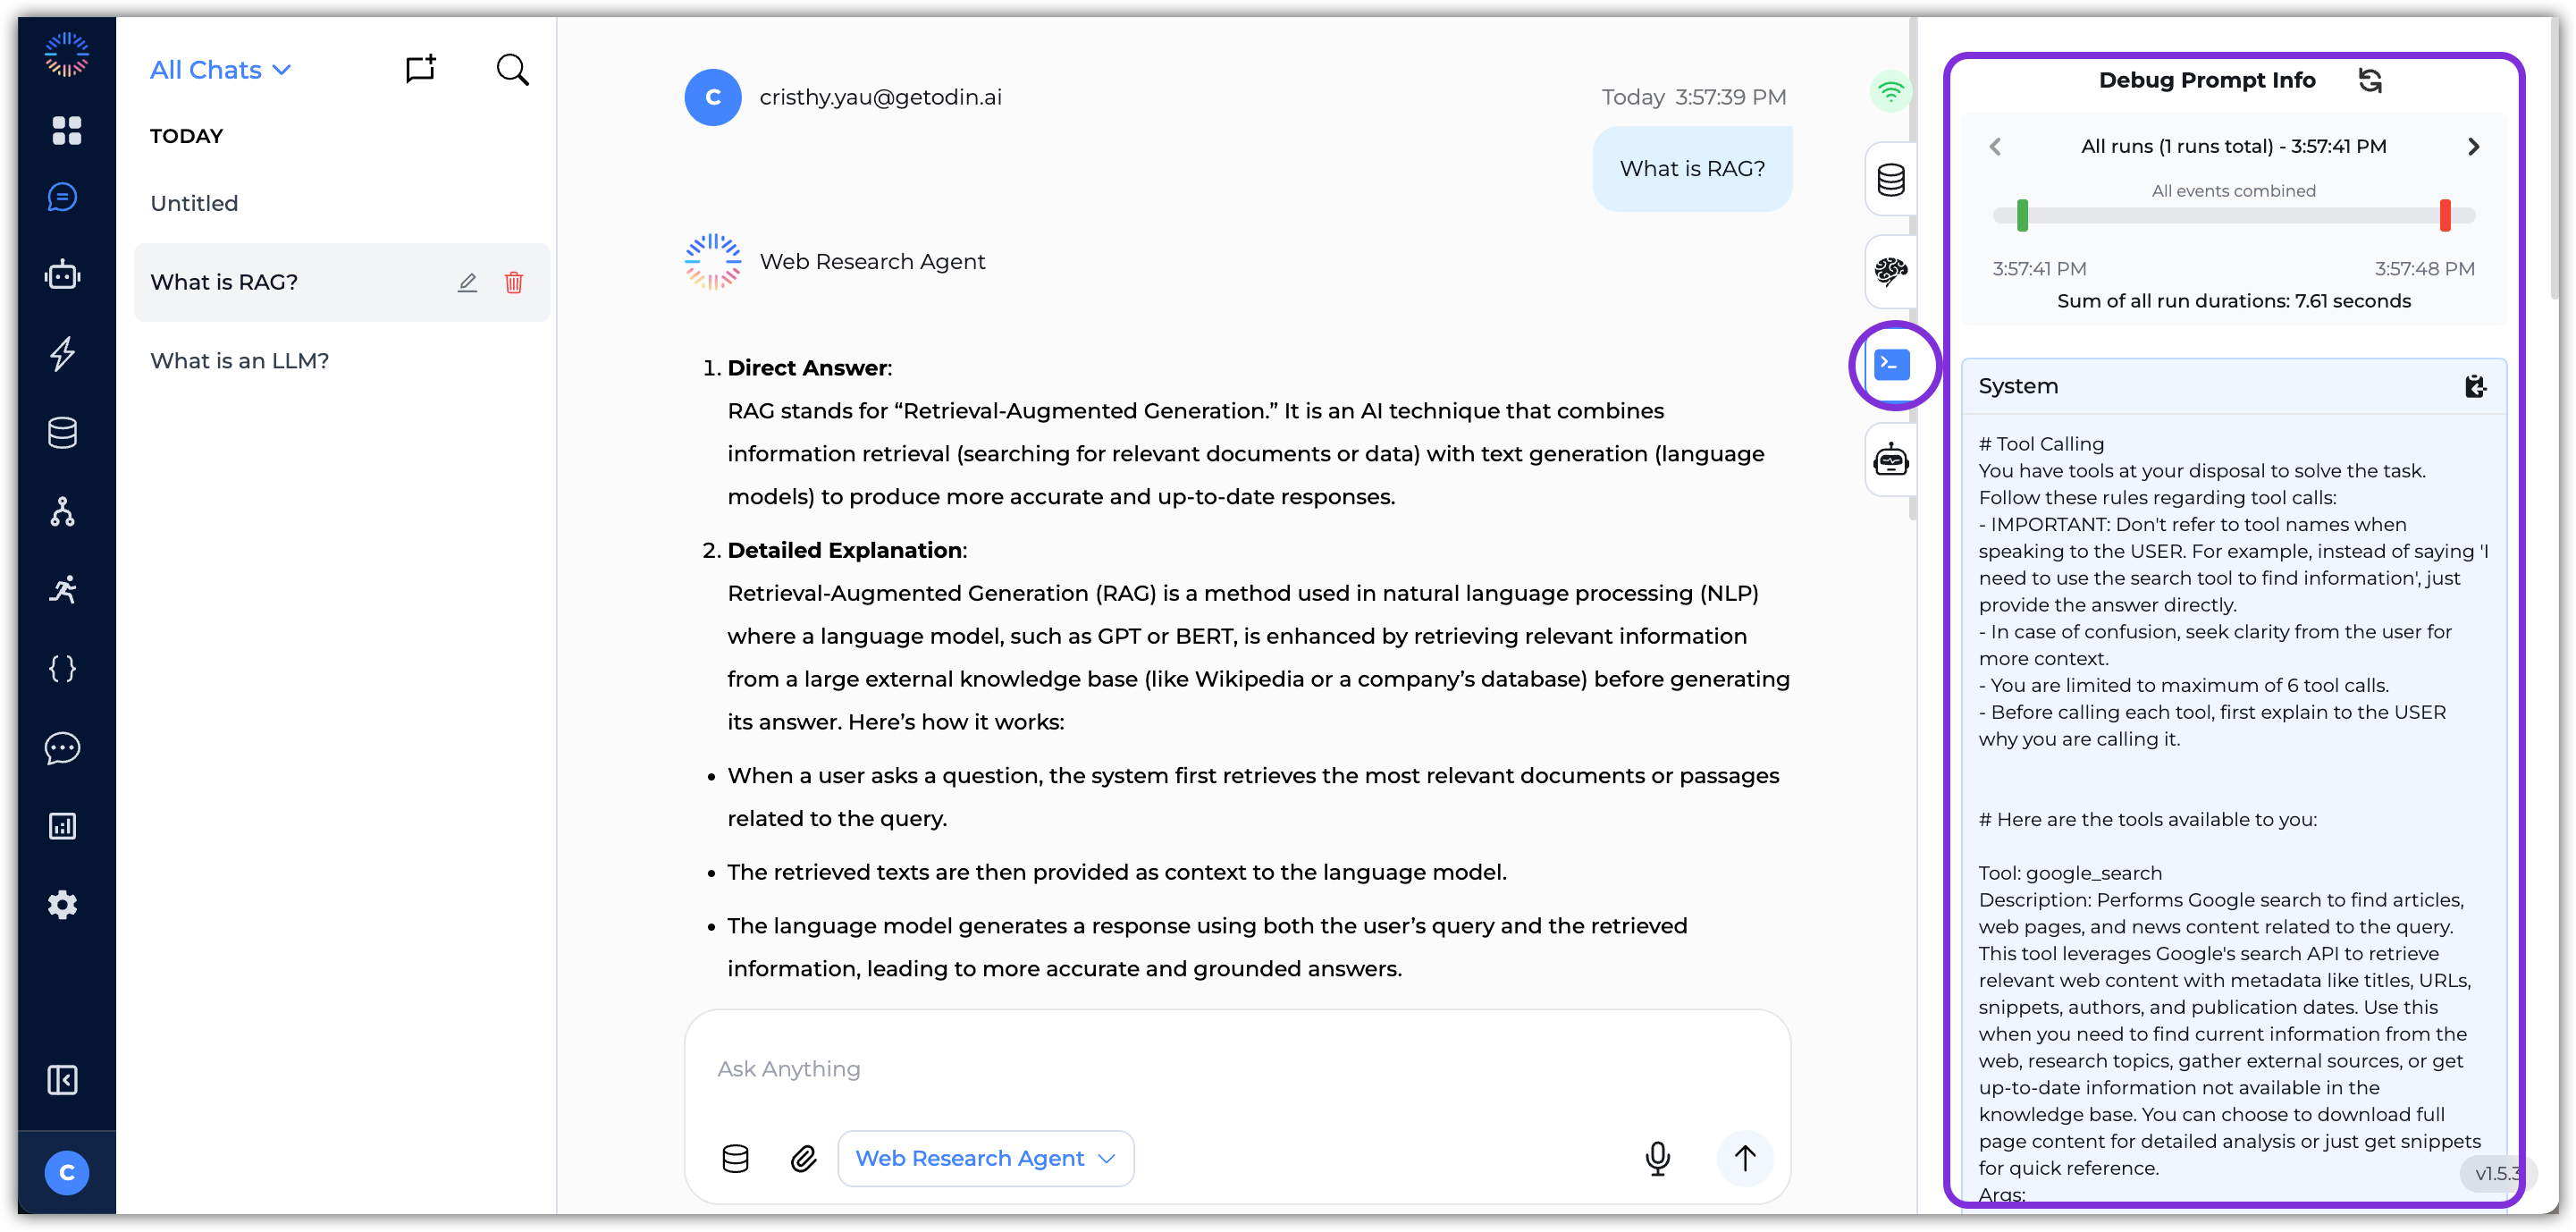
Chat Debug Panel
- Document Context Results – This tab shows the retrieved Knowledge Base results the agent used to generate its response, including the source name, content snippet, and relevance score. If no relevant information was found, it will state “No results found.”
- Chat Context – In this tab, you can manually input additional context for the agent to consider in its responses. This can be useful if you want to provide specific information that may not be present in the chat history or Knowledge Base. Make sure to click Save after entering context to ensure it is applied to the agent’s future responses.
- Debug Prompt Info – This tab explains the details on the prompt and context that was sent to LLM on every execution for debugging purposes.
- Agent Execution – This tab details the tool calls made by the agent and displays any errors (if any) for debugging purposes.
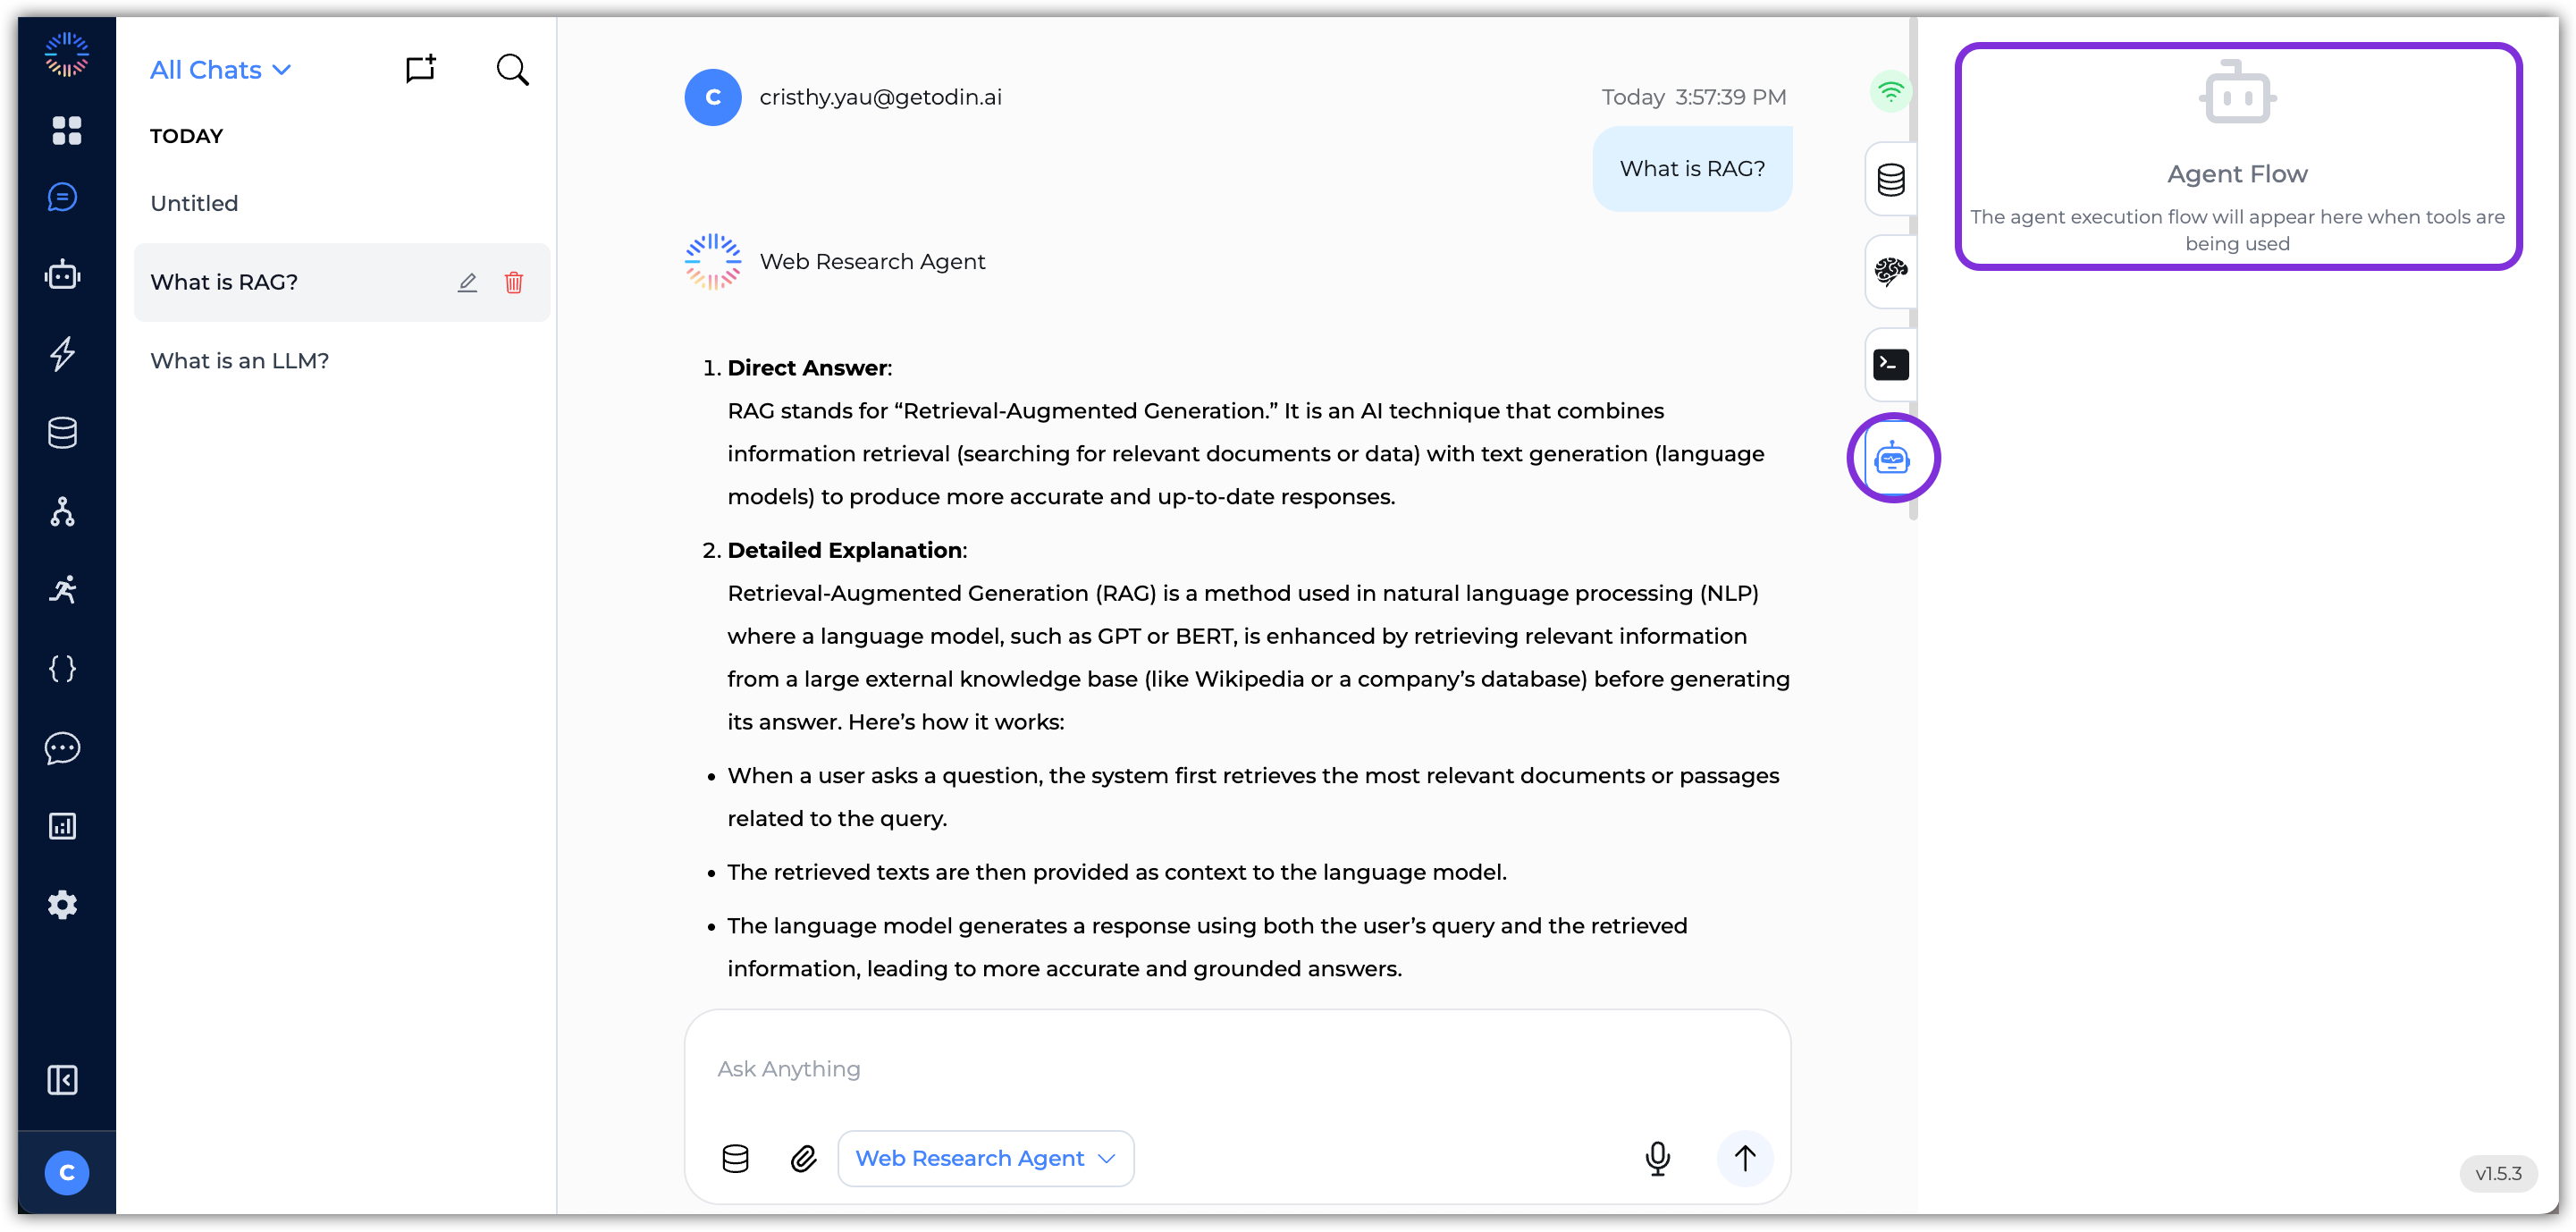
Agent Response Actions
In the agent’s response, you may see the following elements:- Text: The main content of the response.
- Sources: If the agent references documents from your Knowledge Base, these will be listed as sources underneath the response text. You can click on them to view more details in the Document Context Results tab.
- Actions: For all agent responses, you can do the following:

- Thumbs Up/Down: Provide feedback on the response as good or incorrect/unhelpful.
- Text-to-Speech: Click the speaker icon to hear the response read aloud.
- Copy: Click the copy icon to copy the response text to your clipboard.
- Save as Q&A: Click the bookmark icon to save the Q&A pair to the Knowledge Base for quick retrieval later.
- Export: Click the export icon to download the response for further use.
- Feedback: Click the Feedback link to provide detailed feedback on the response. Feedback provided through this method will be recorded and displayed on the Analytics dashboard.
Getting Started with Chats
To start using Chats in your Odin AI project, follow these steps:- In your Odin AI project, navigate to the Chat section from the left-hand menu.
- Click on the New Chat button to create a new chat session.
- Select an agent from the dropdown menu at the top of the chat interface. The available agents will depend on the ones you have set up in your project.
- Type your message or query in the chat input box at the bottom of the screen.
- Press
Enteror click the Send button to submit your message. The selected agent will process your input and generate a response. - Continue the conversation by typing additional messages or queries. The agent will take into account the context of the chat history to provide more relevant responses.
Exporting Chat Responses
You can export the agent’s responses for further use or sharing. To do this:- After the agent has generated a response, click the Export icon located underneath the response text.
- Choose the desired format for export:

txt– Exports the response as a plain text file.docx– Exports the response in a Word document format.csv– Structures the response in a spreadsheet format.
- Click Export to download the file to your computer. The response will be saved in the selected format for easy access and sharing.
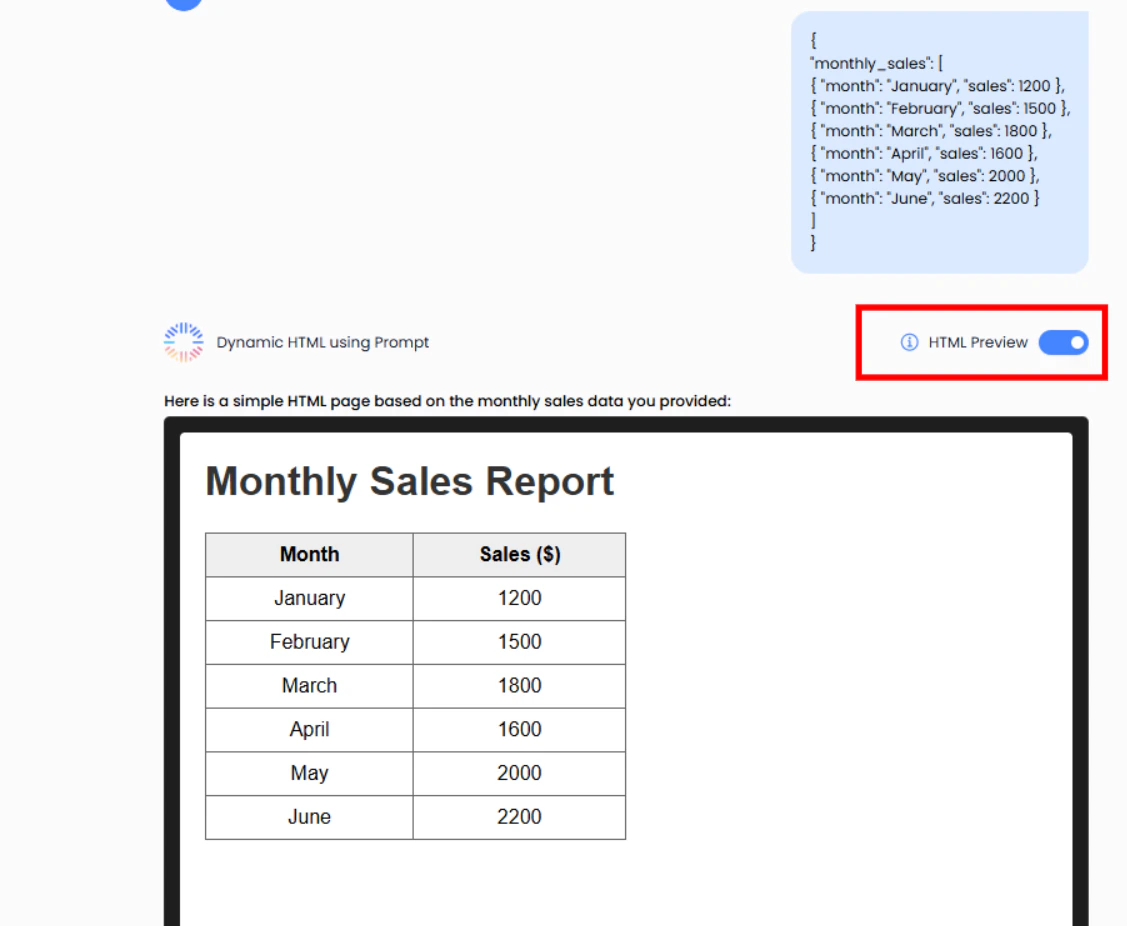
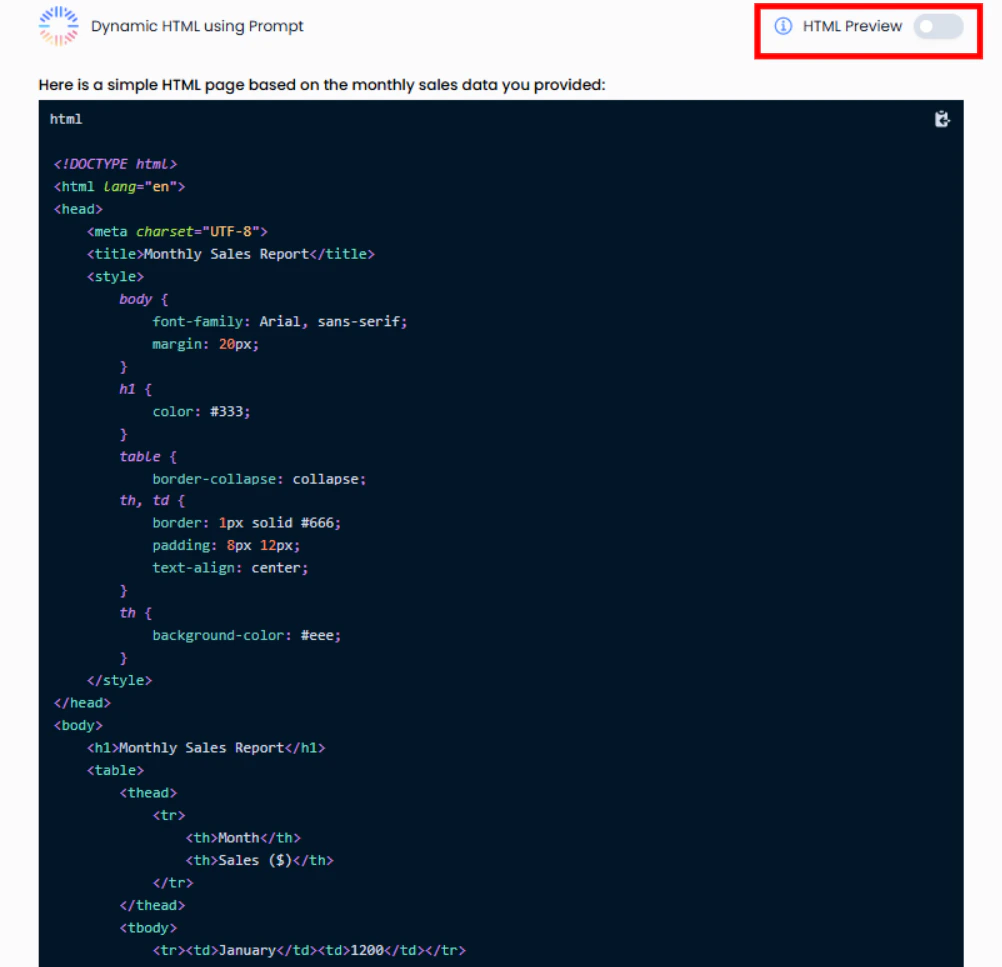
Create Dynamic HTML Views
There are two primary methods used to generate dynamic HTML views based on data inputs: utilizing Prompt Agents and employing Embedded Scripting with Node.js. Both approaches allow for the creation of flexible, data-driven interfaces that adapt to changing information without the need for manual static coding.Prompt Agents for Dynamic HTML View Generation
Prompt agents are AI-driven components designed to generate content based on inputs and predefined instructions (prompts). In the context of creating dynamic HTML views, prompt agents take structured data (typically JSON) as input and produce HTML code that represents a visual view of that data. The key feature of this approach is dynamism: the data provided to the agent can change, and the resulting HTML adapts accordingly. This allows for flexible, data-driven UI rendering without manually coding HTML for every possible data variation.Implementation Process
- Create Agent: Configure the agent with a specific prompt instructing it to create HTML structures.
- Input Data: In a new chat session, select the created Agent and input the data.
- View Generation: The response will include a toggle button functionality.
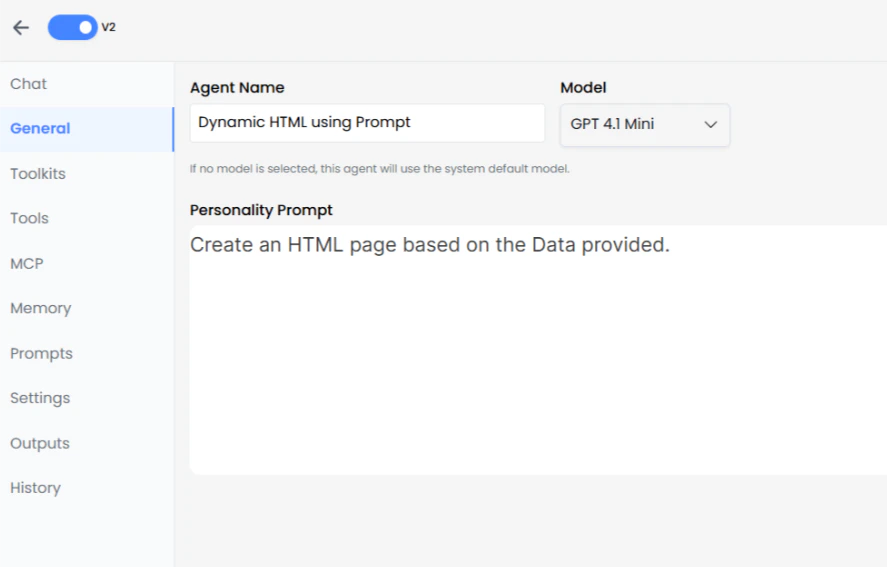
Output Features
- HTML View (Toggle On): Displays the rendered visual representation of the data.
- HTML Code View (Toggle Off): Displays the raw source code generated by the agent.