

Navigation
The Knowledge Base can be accessed from the left-hand sidebar by clicking on Knowledge Base.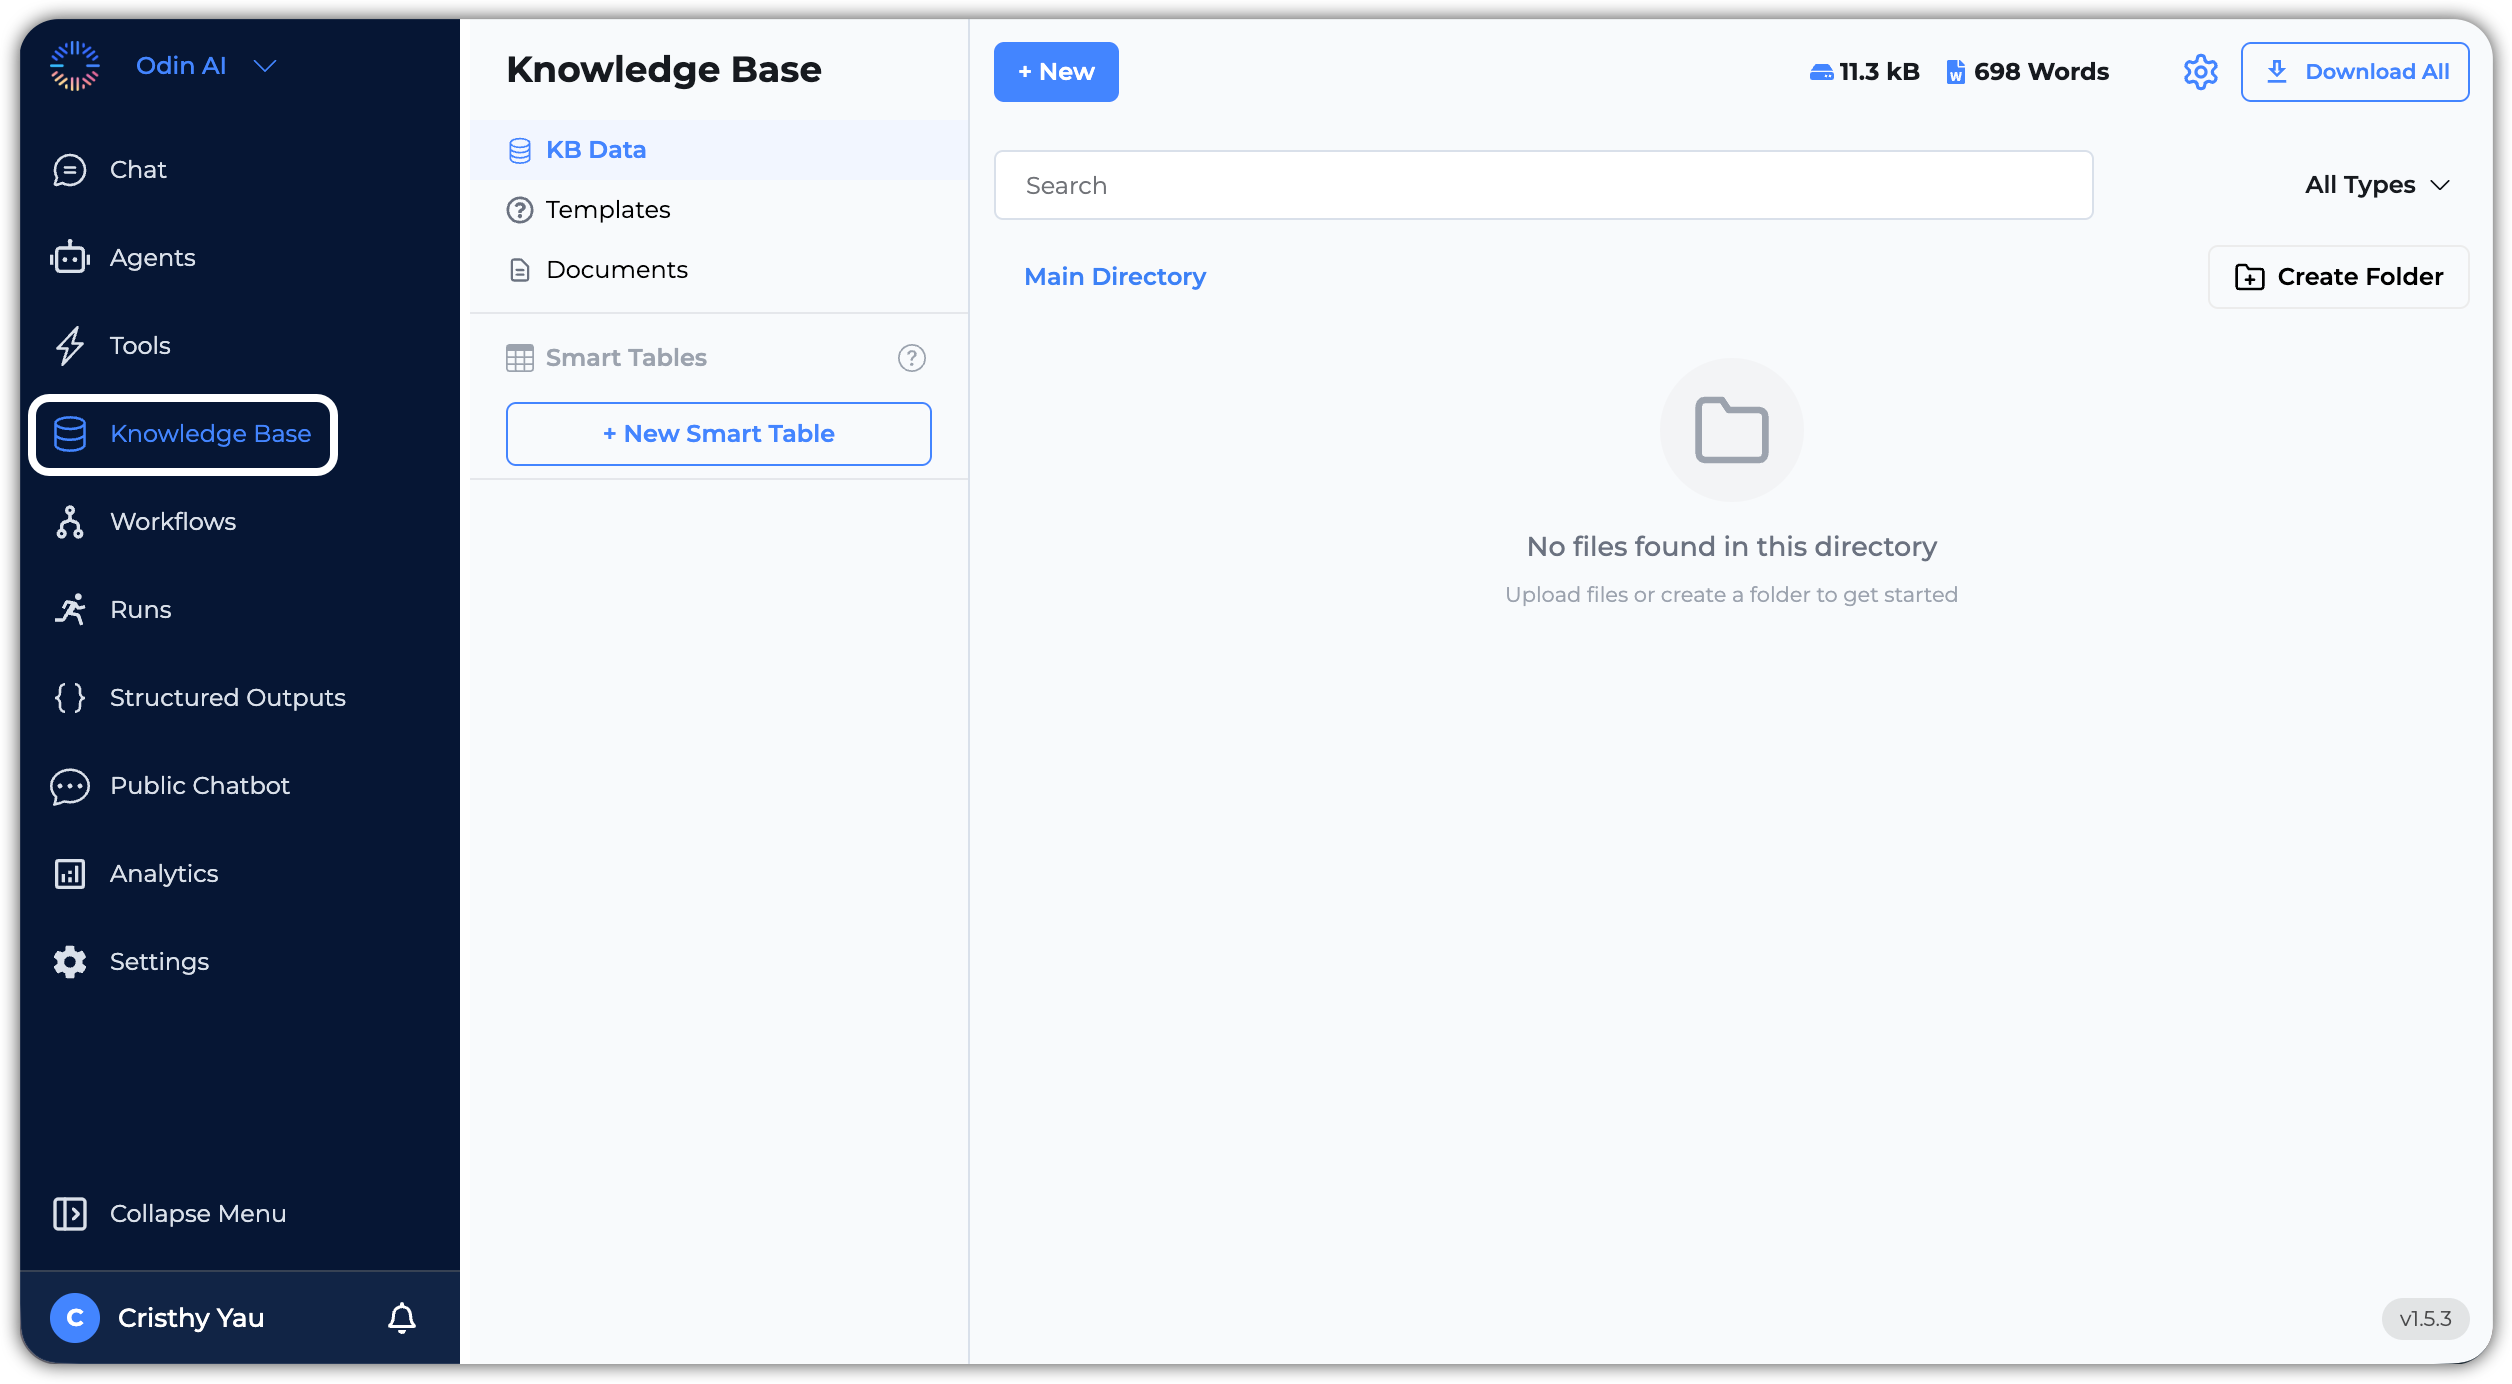
KB Data
KB Data
KB Data acts as the main repository where all retrieved information is stored. You can view, manage, and organize your knowledge base data here. This section includes uploaded documents, web crawls, and data fetched from third-party integrations.
Let’s explore the key features of the KB Data section:
- Main Directory: The main directory displays all the knowledge base data in a structured format. You can see the list of documents, their types, and other relevant details.
- +New: Click this button to add new knowledge base data. You can upload files or folders, initiate web crawls, upload data from a URL, or create a document.
- Search Bar: Use the search bar to quickly find specific documents or information within your knowledge base.
- Storage & Word Count: This section shows the total storage used and the word count of your knowledge base data.
- Settings: Click the settings icon to configure how your knowledge base processes and embeds documents, which affect how content is chunked, embedded, and retrieved. You can also manage the Connectors (i.e., third-party integrations), crawlers, and the sync & schedule of the Knowledge Base with the connected third-party apps from this section.
- Download All: Click this button to download all the knowledge base data as a ZIP file.
- File Filter: Use the file filter to view documents by type: PDF, Word, Excel, PowerPoint, Text, CSV, and more.
- Create Folder: Click this button to create a new folder to organize your knowledge base data.
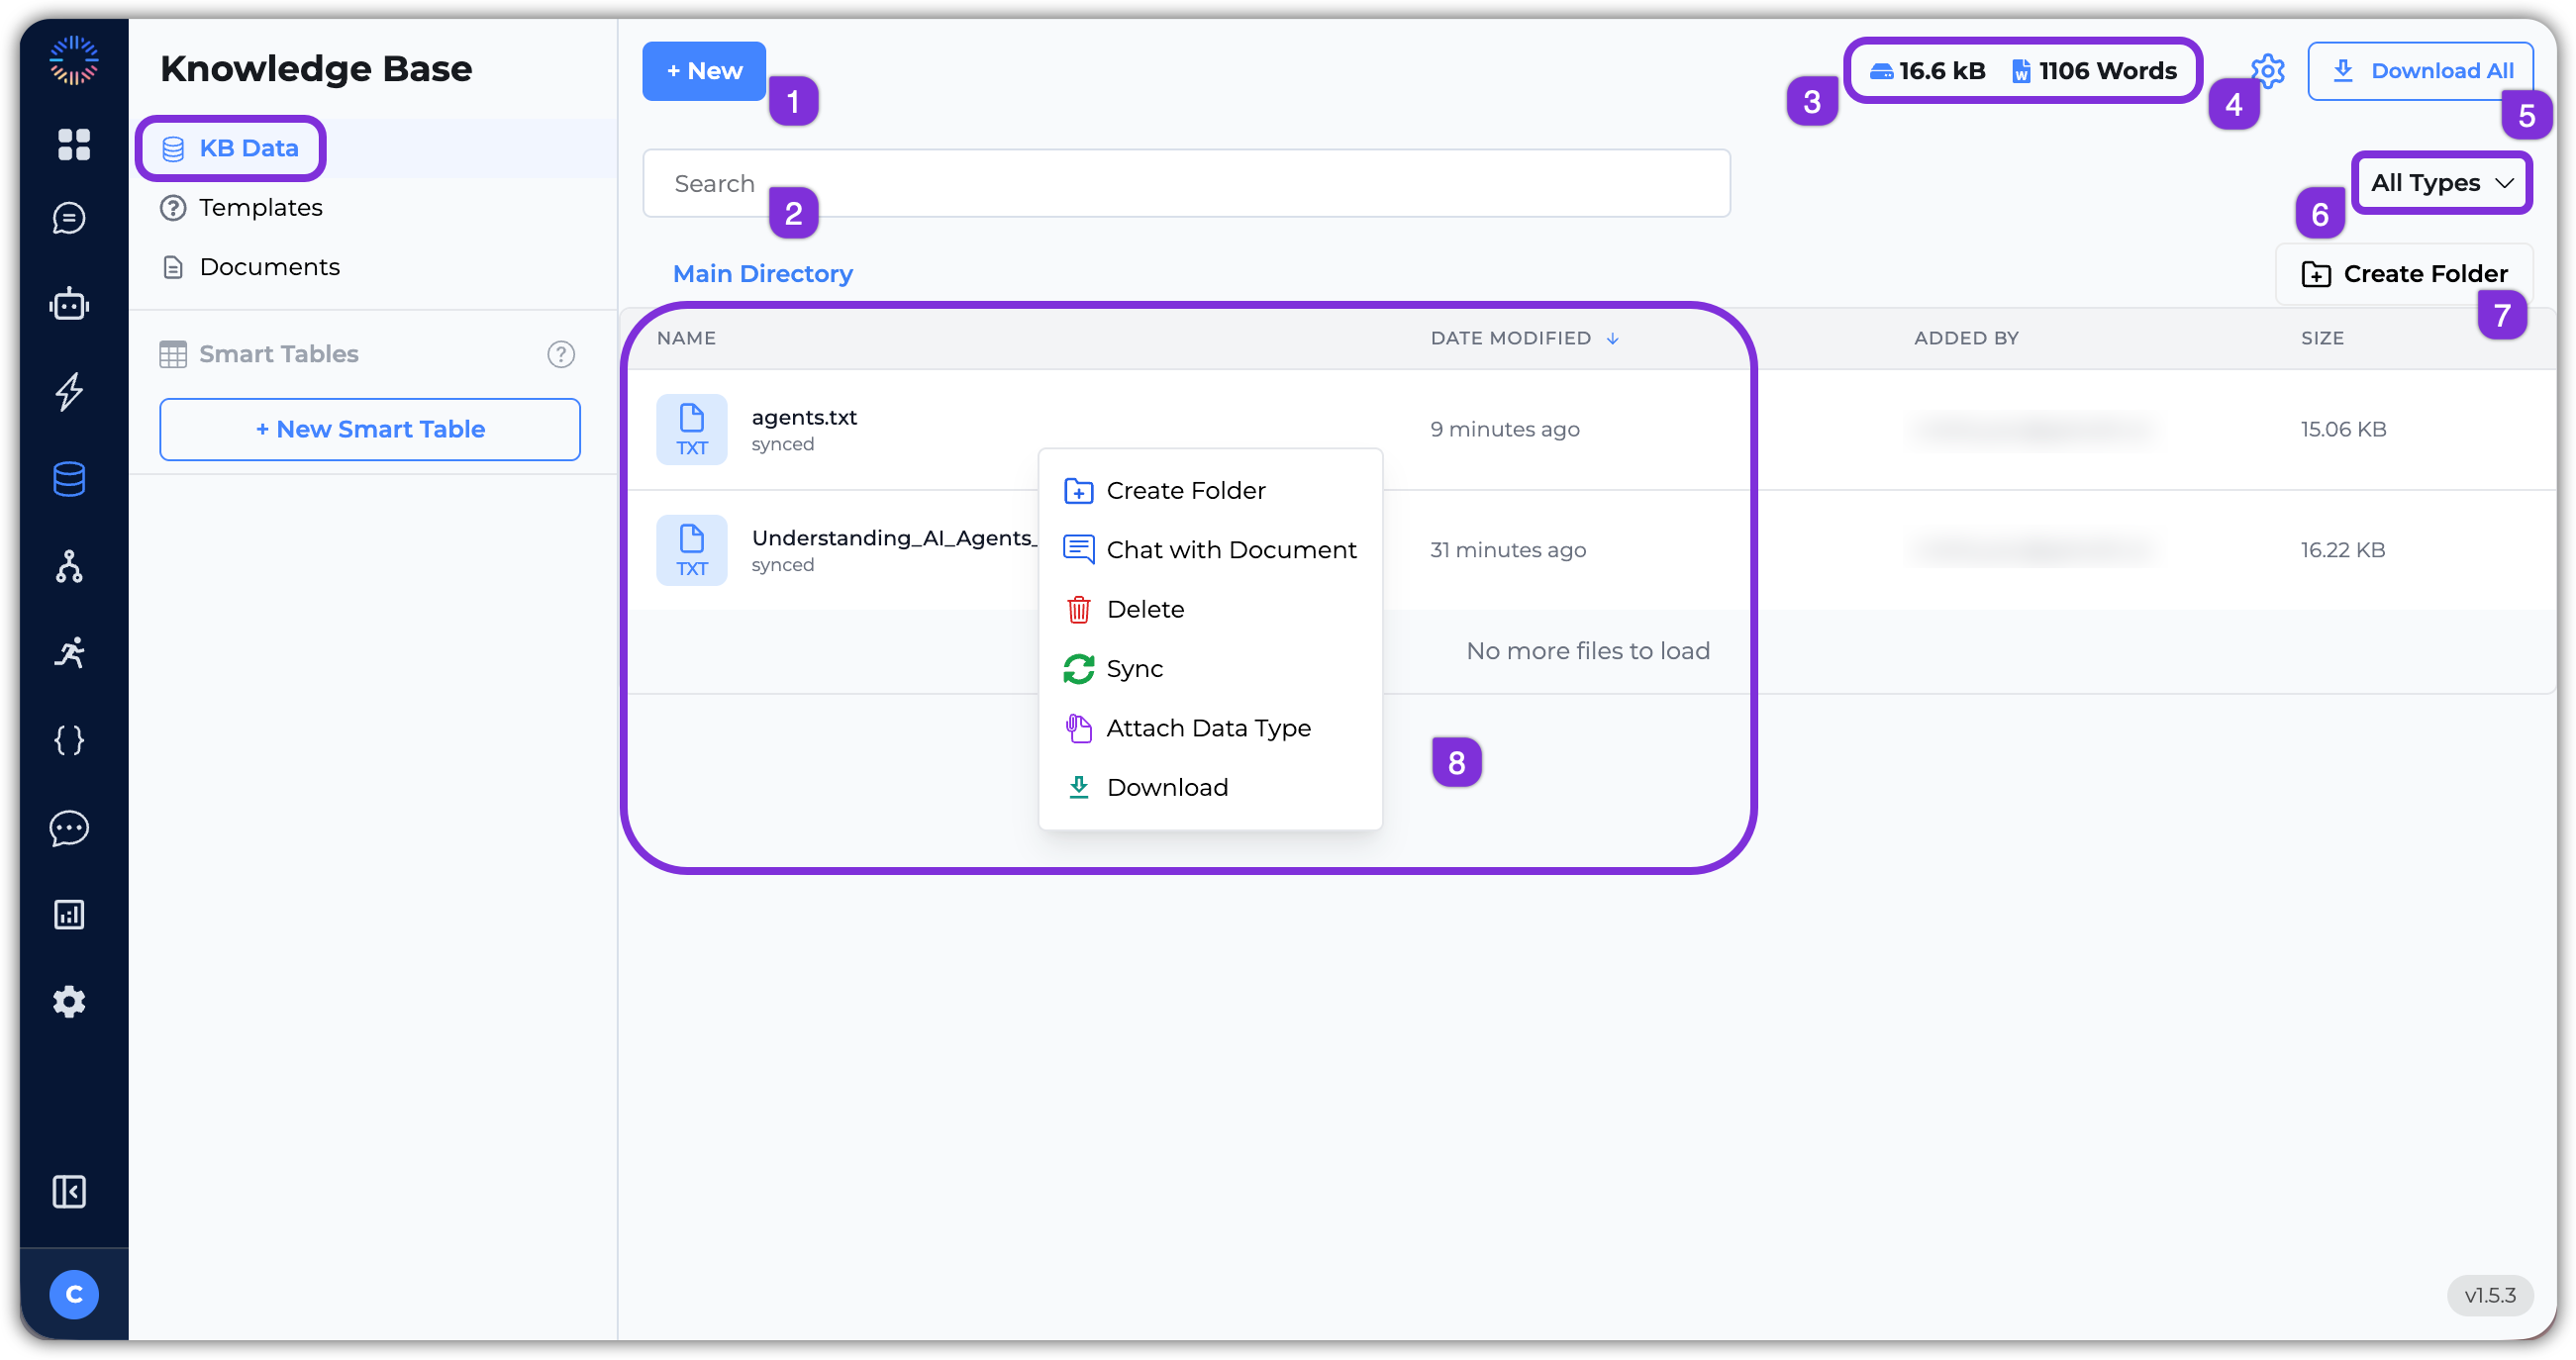
- File List: This section displays the list of files and folders in your knowledge base. You can click on a file to view its content and metadata, and you can right-click on a file or folder to access additional options such as:
- Create Folder: Create a new folder within the current directory.
- Chat with Document: Open a chat interface to interact with the content of the selected document.
- Delete: Remove the selected file or folder from the knowledge base.
- Sync: Manually sync the selected file or folder to reprocess the content in the file.
- Attach Data Type: This option allows you to attach a data schema to the selected file, enabling structured data extraction and querying capabilities.
- Download: Download the selected file to your local device.
- Knowledge Base Settings: Here are the key settings you can configure:
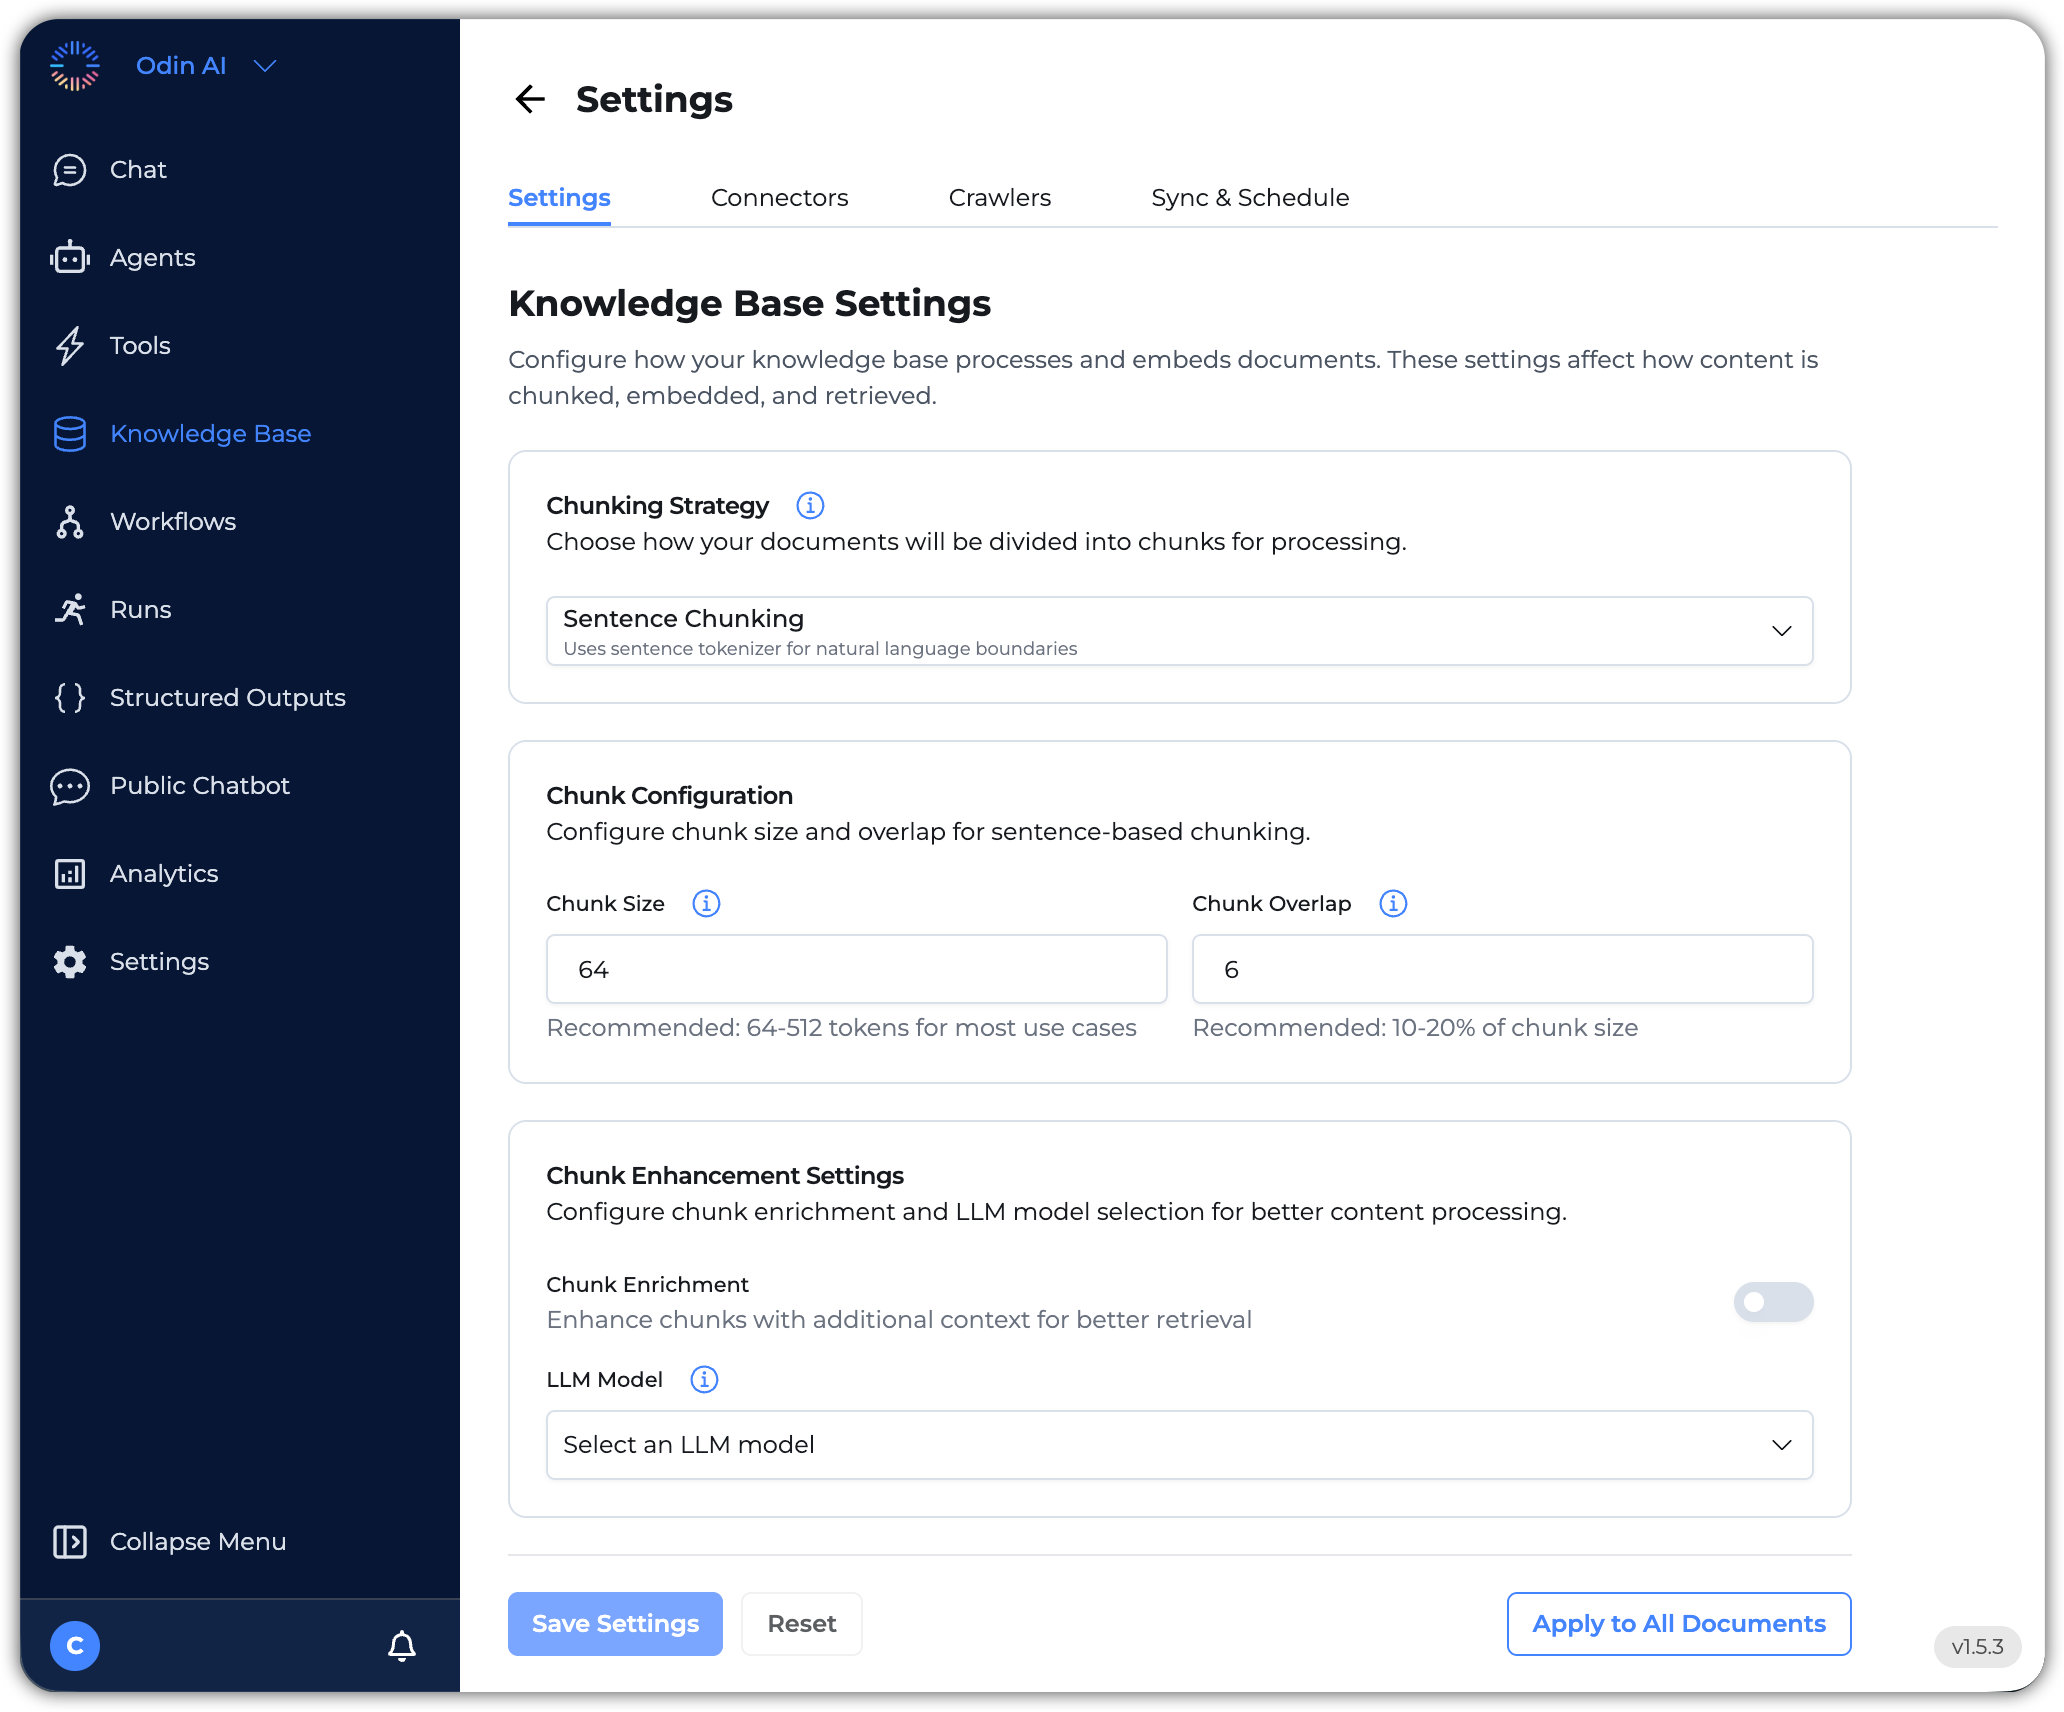
- Chunking Strategy: Configure how documents will be divided into chunks for processing. Select between these options:
- Sentence Chunking: Divides text into chunks based on sentence boundaries, ensuring that each chunk contains complete sentences. This option uses the sentence tokenizer for natural language boundaries.
- Semantinc Chunking: Divides text into semantically meaningful chunks, which may not align with sentence boundaries. This option uses the semantic tokenizer for natural language boundaries.
- Chunk Configuration: This configuration appears when you select Sentence Chunking. Here you can configure the chunk size and overlap for sentence-based chunking.
- Chunk Size: Specify the maximum of each chunk in tokens/characters. The default is
64. The recommendation is between64to512tokens for most use cases. Larger chunks preserve context but may be less precise for retrieval. - Chunk Overlap: Specify the number of overlapping words between consecutive chunks. This helps maintain context across chunk boundaries. The default is
16. The recommendation is between 10 to 20% of the set chunk size. - Chunk Enhancement Settings: Enable this setting to enhance chunking with additional context for better retrieval. When enabled, you can select an LLM model for chunk enrichment and content analysis.
- Chunk Size: Specify the maximum of each chunk in tokens/characters. The default is
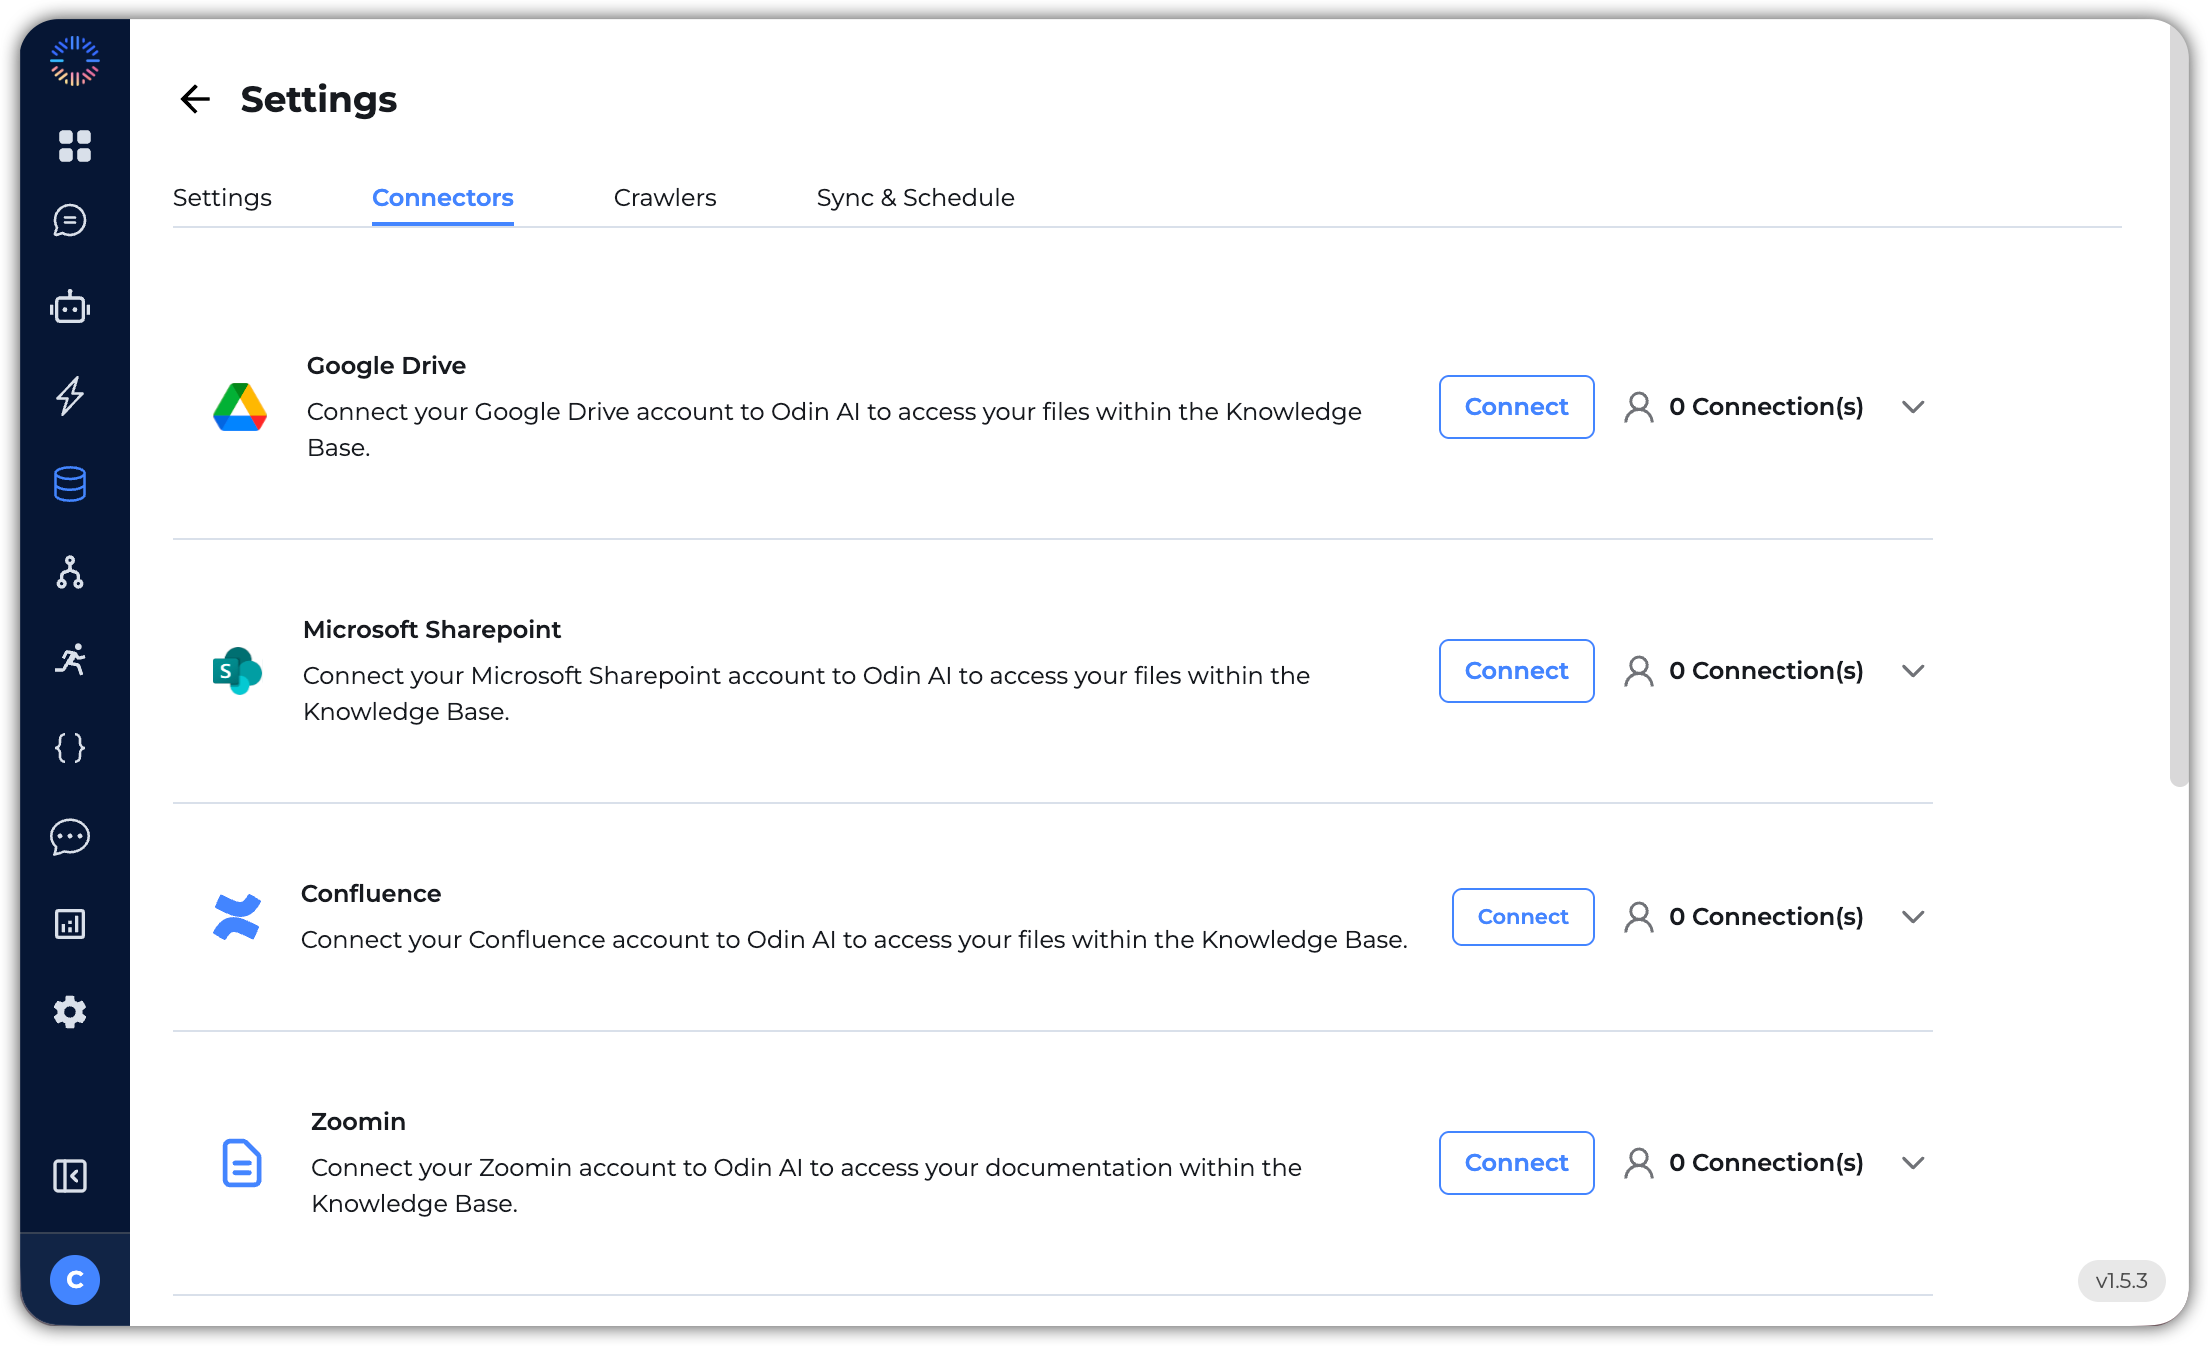
- Connectors: Manage third-party integrations like Google Drive, SharePoint, Confluence, and Zoomin.
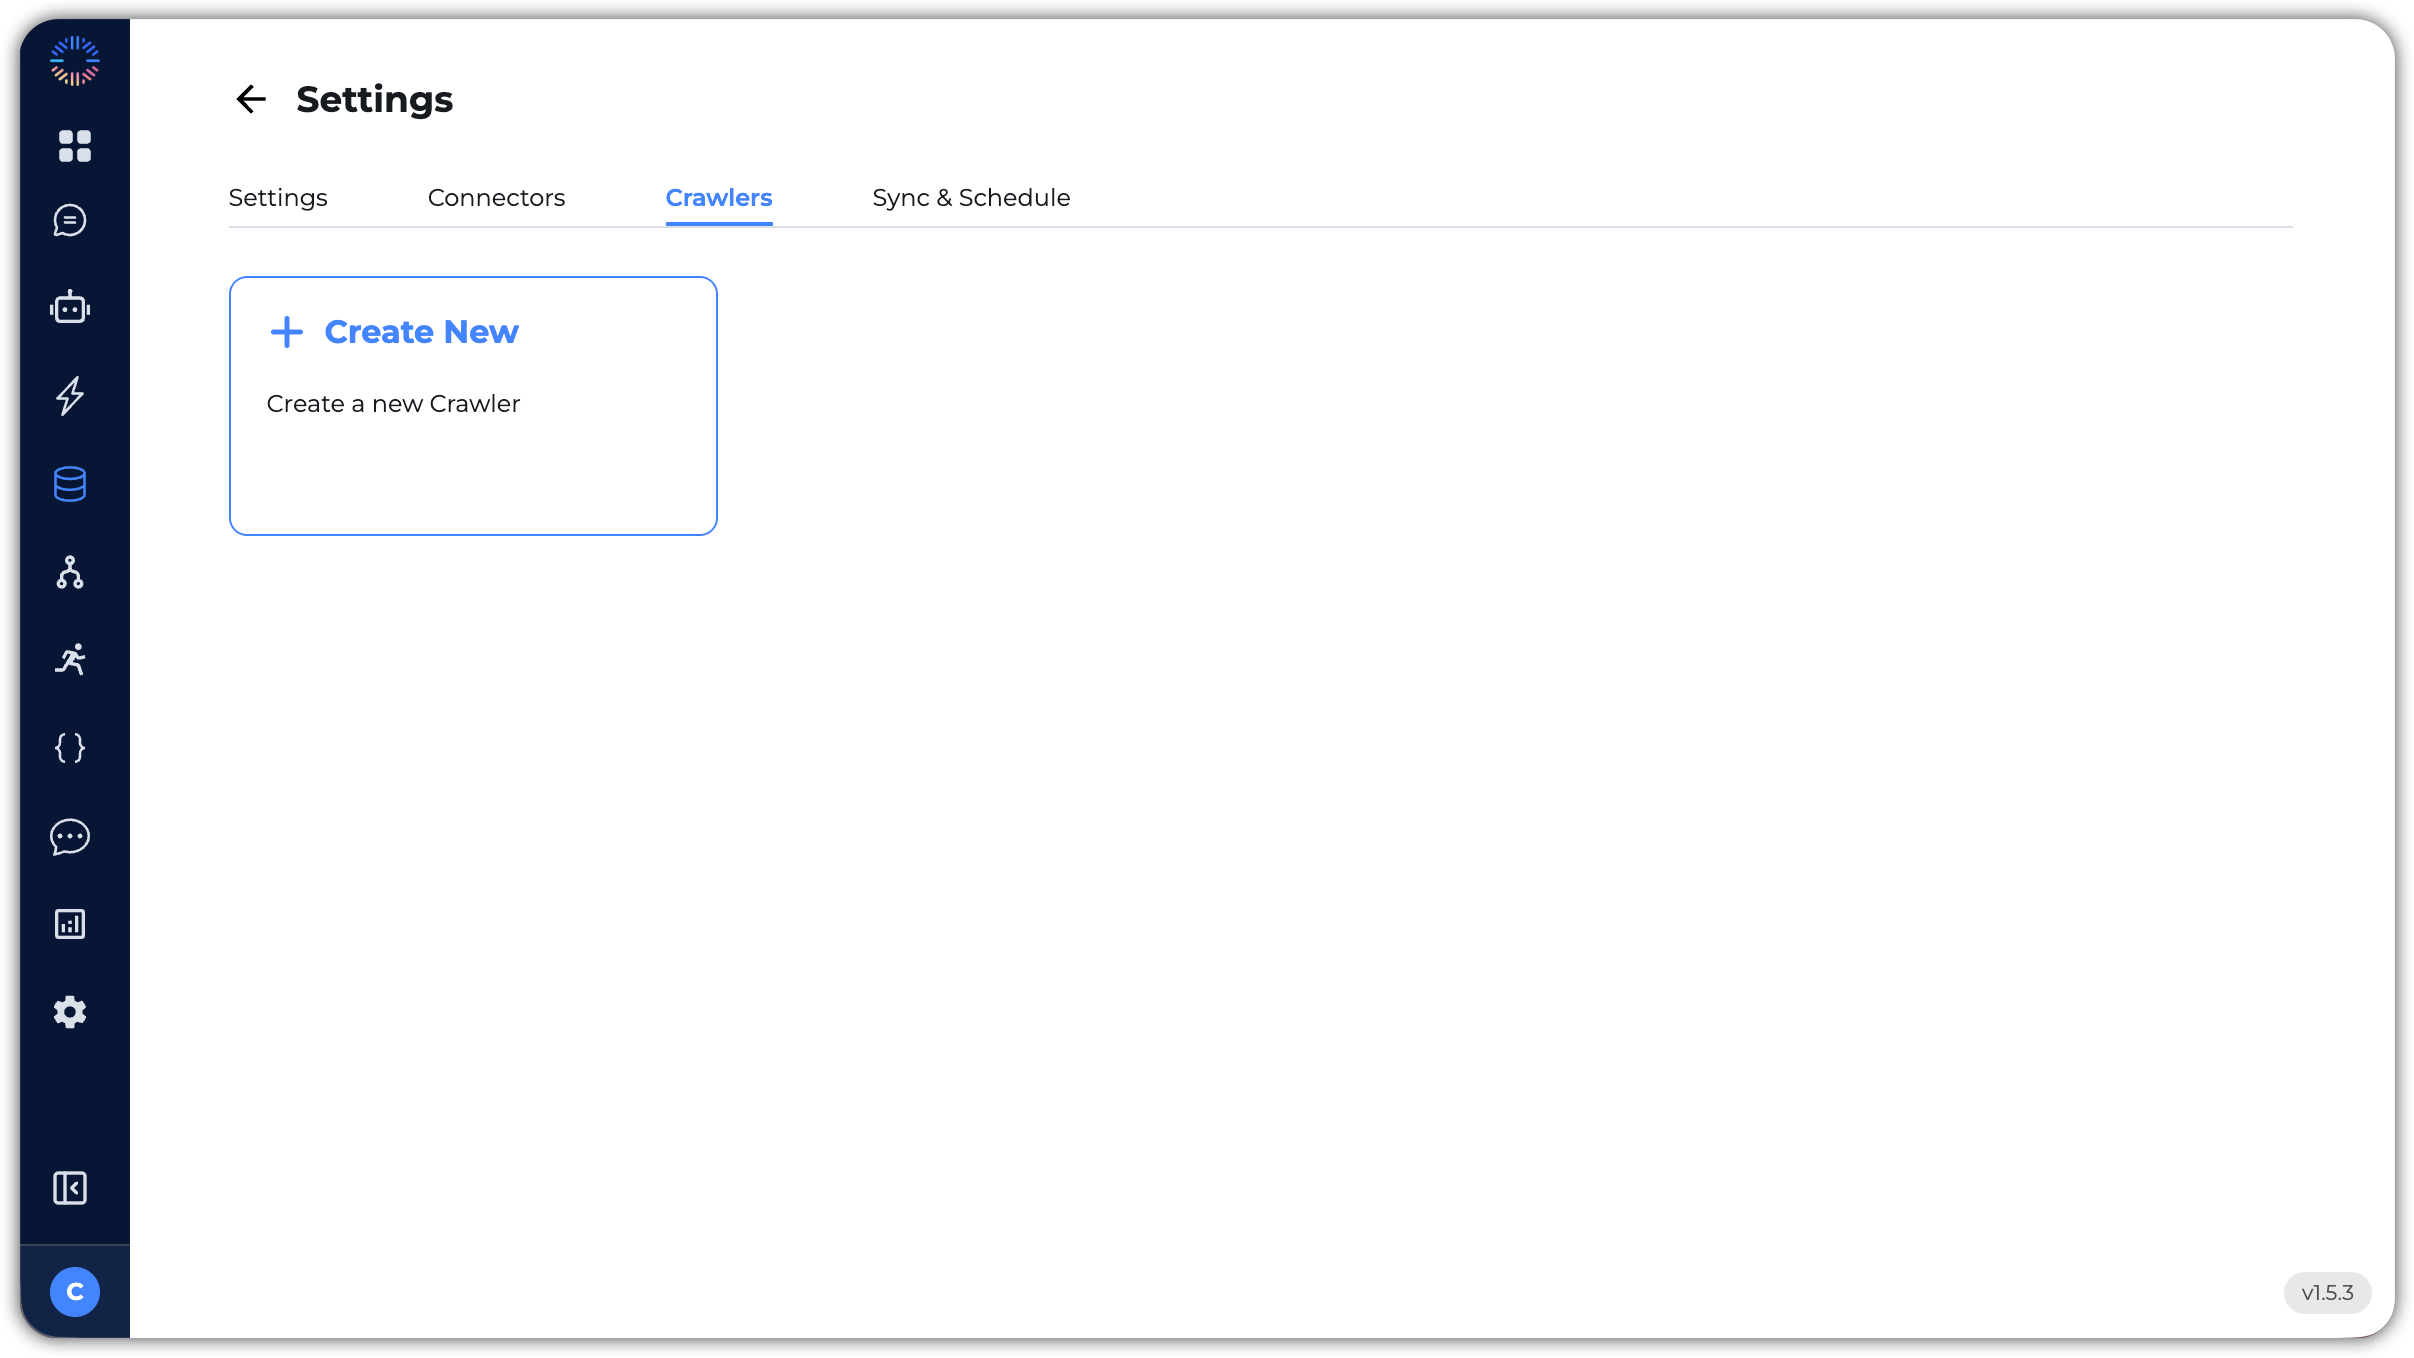
- Crawlers: Create new web crawlers to fetch data from your website’s domain URL. Any page the crawler can discover within the website will be automatically crawled and added to the Knowledge Base. You can also set a sync schedule for automatic crawling that adds the latest information from any newly added pages.
- Sync & Schedule: Manage the sync and schedule settings for your Knowledge Base. Here you can view and manage the sync schedules for your third-party integrations, as well as run a manual sync to fetch the latest data.

- Chunking Strategy: Configure how documents will be divided into chunks for processing. Select between these options:
Templates
Templates
Templates can be pairs of Q&As, response templates and examples you can pre-define to help guide your AI agents in generating more accurate and contextually relevant responses using these templates, rather than searching for the answer in full documents, making resposes faster. You can create, manage, and organize templates to suit your specific use cases. For FAQ-style templates, you can also associate a file from the Knowledge Base to provide additional context for the AI agent.
Let’s explore the key features of the Templates section:

- Search Bar: Use the search bar to quickly find specific templates within your knowledge base.
- Add Template: Click this button to create a new template. You can define the type (FAQ, Template, or Example), content, and associate a file from the Knowledge Base for additional context.
Documents
Documents
In the Documents section, you can create new text-based files directly within the Knowledge Base without needing to upload them. This feature enables seamless documentation, editing, and integration with AI-driven knowledge retrieval.
Let’s explore the key features of the Documents section:
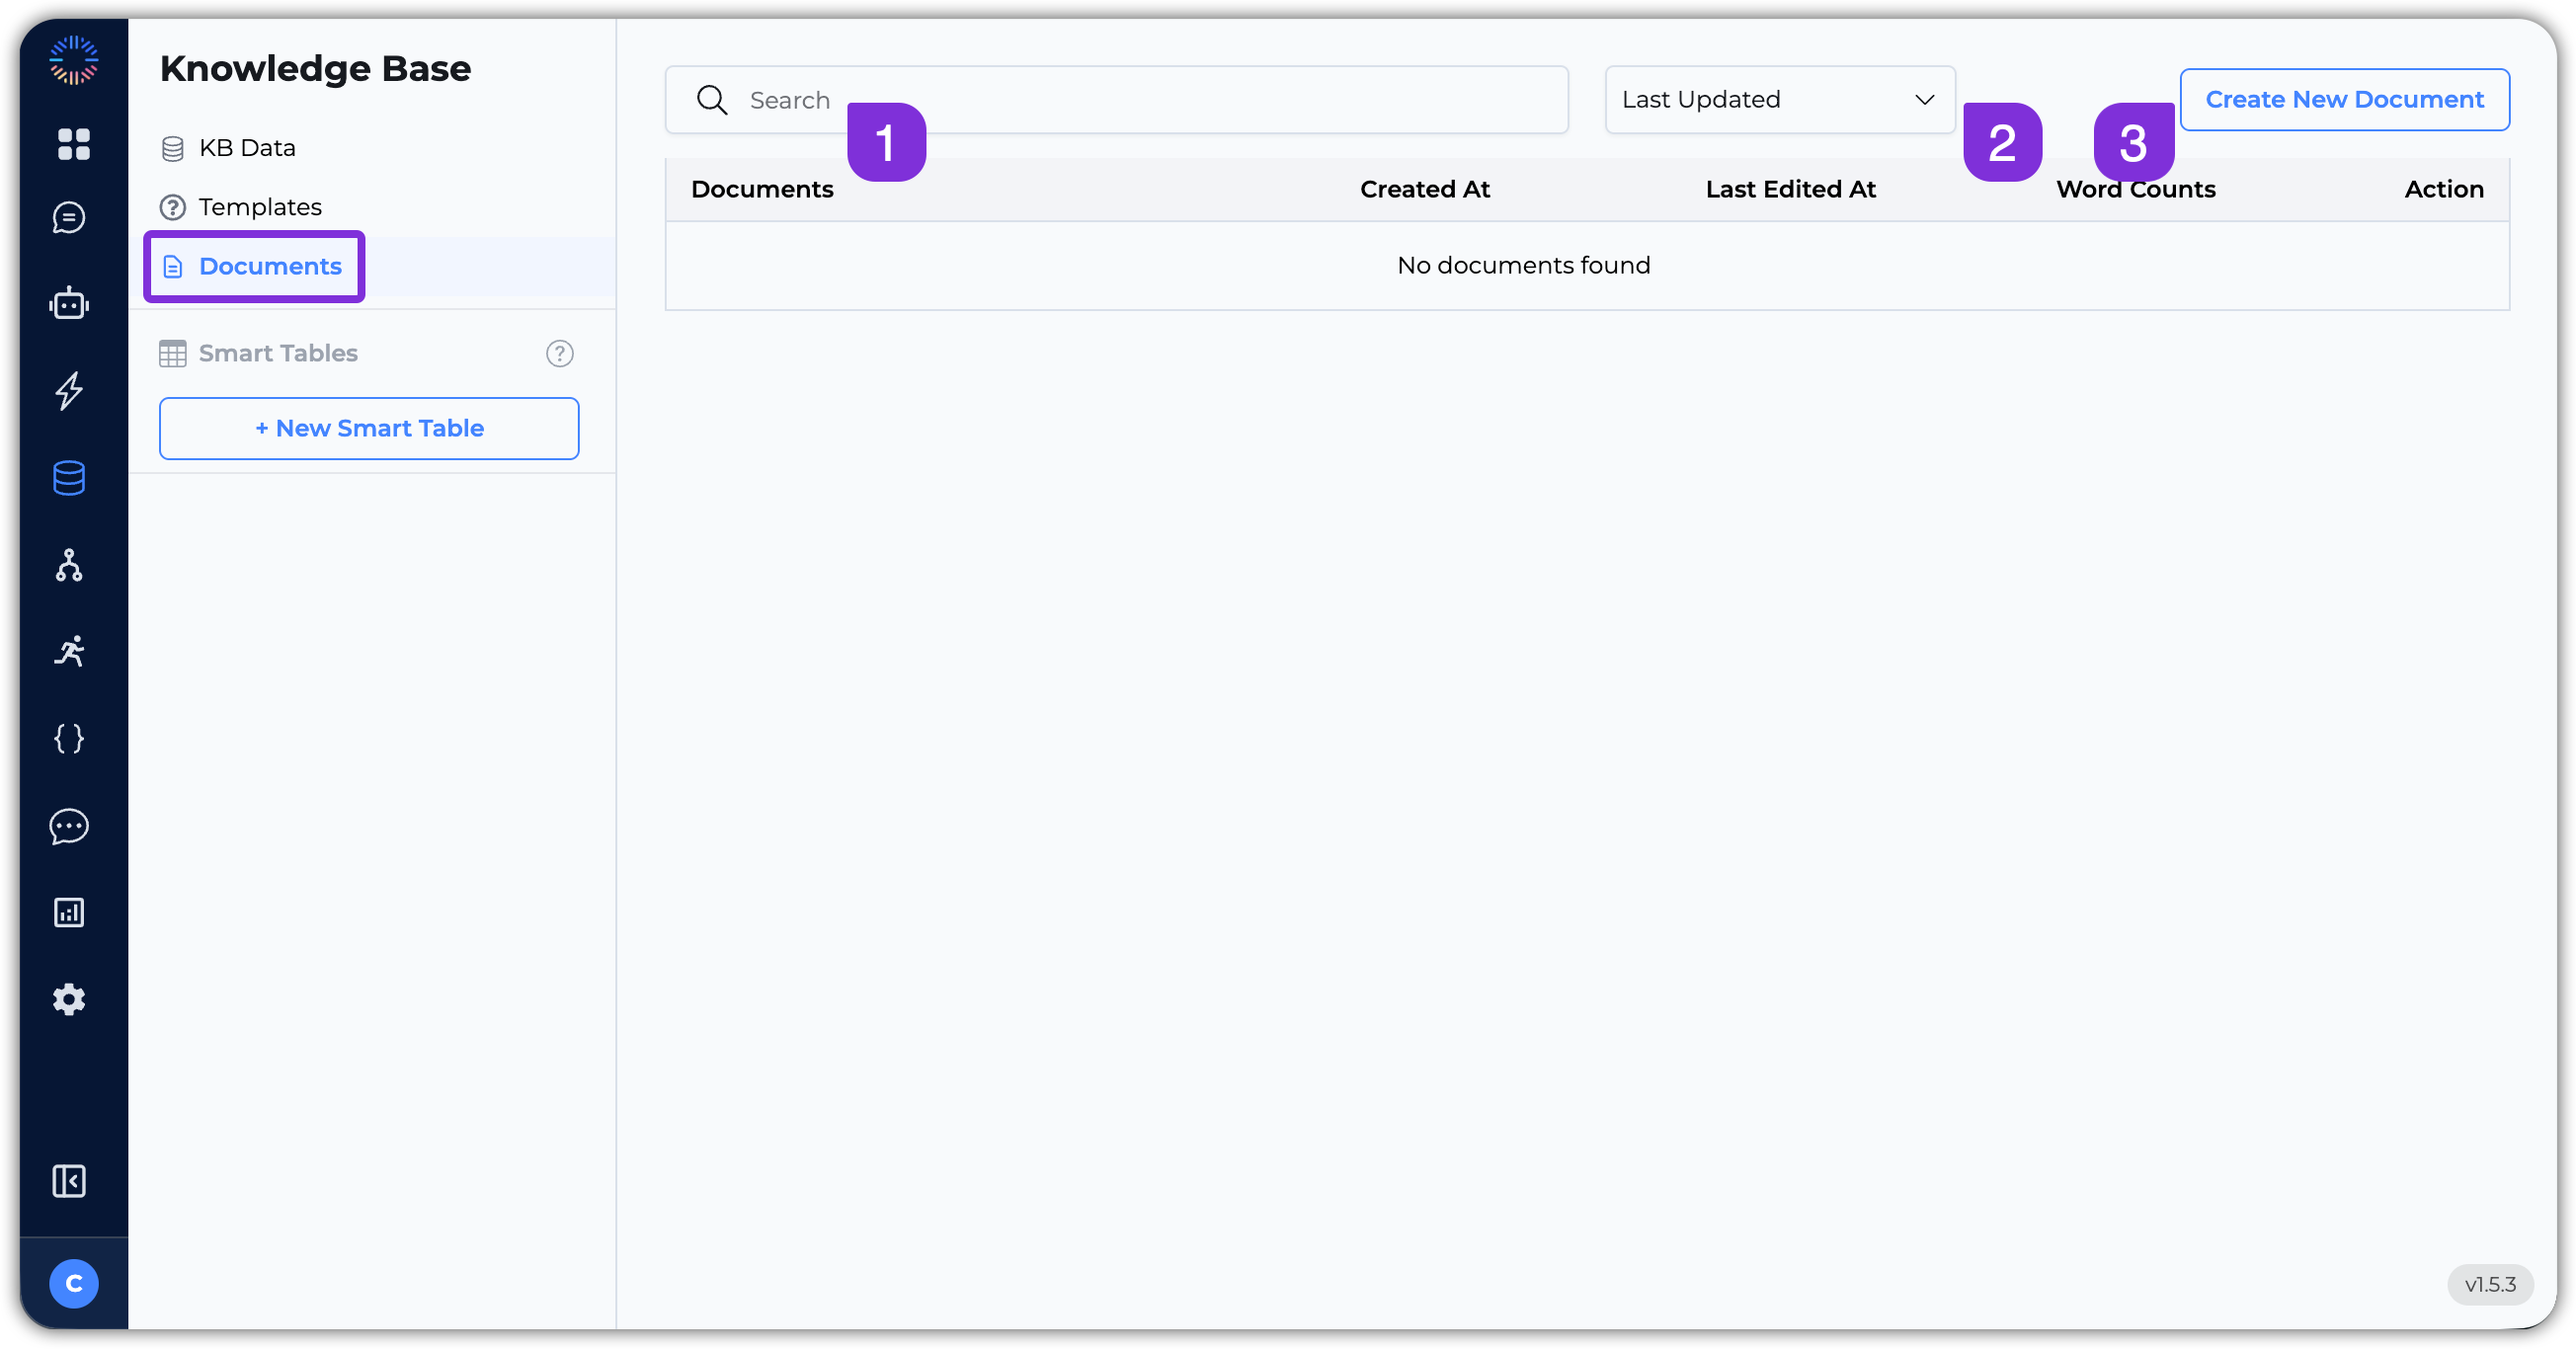
- Search Bar: Use the search bar to quickly find specific documents.
- Filter: Use the filter to view documents by:
Last Updated,Created Date,Title, orWord Count. - Create New Document: Click this button to create a new document.
Smart Tables
Smart Tables
Smart Tables
Smart Tables are dynamic, spreadsheet-like tables built to store, organize, and extract structured data – especially from unstructured sources like PDFs, DOCX, and scanned documents. They’re more than just tables; they are intelligent workspaces where you can upload documents, extract key data using AI, and structure the data in a way that makes decision-making and automation seamless. The applications are endless!Let’s explore the key features of the Smart Tables section:
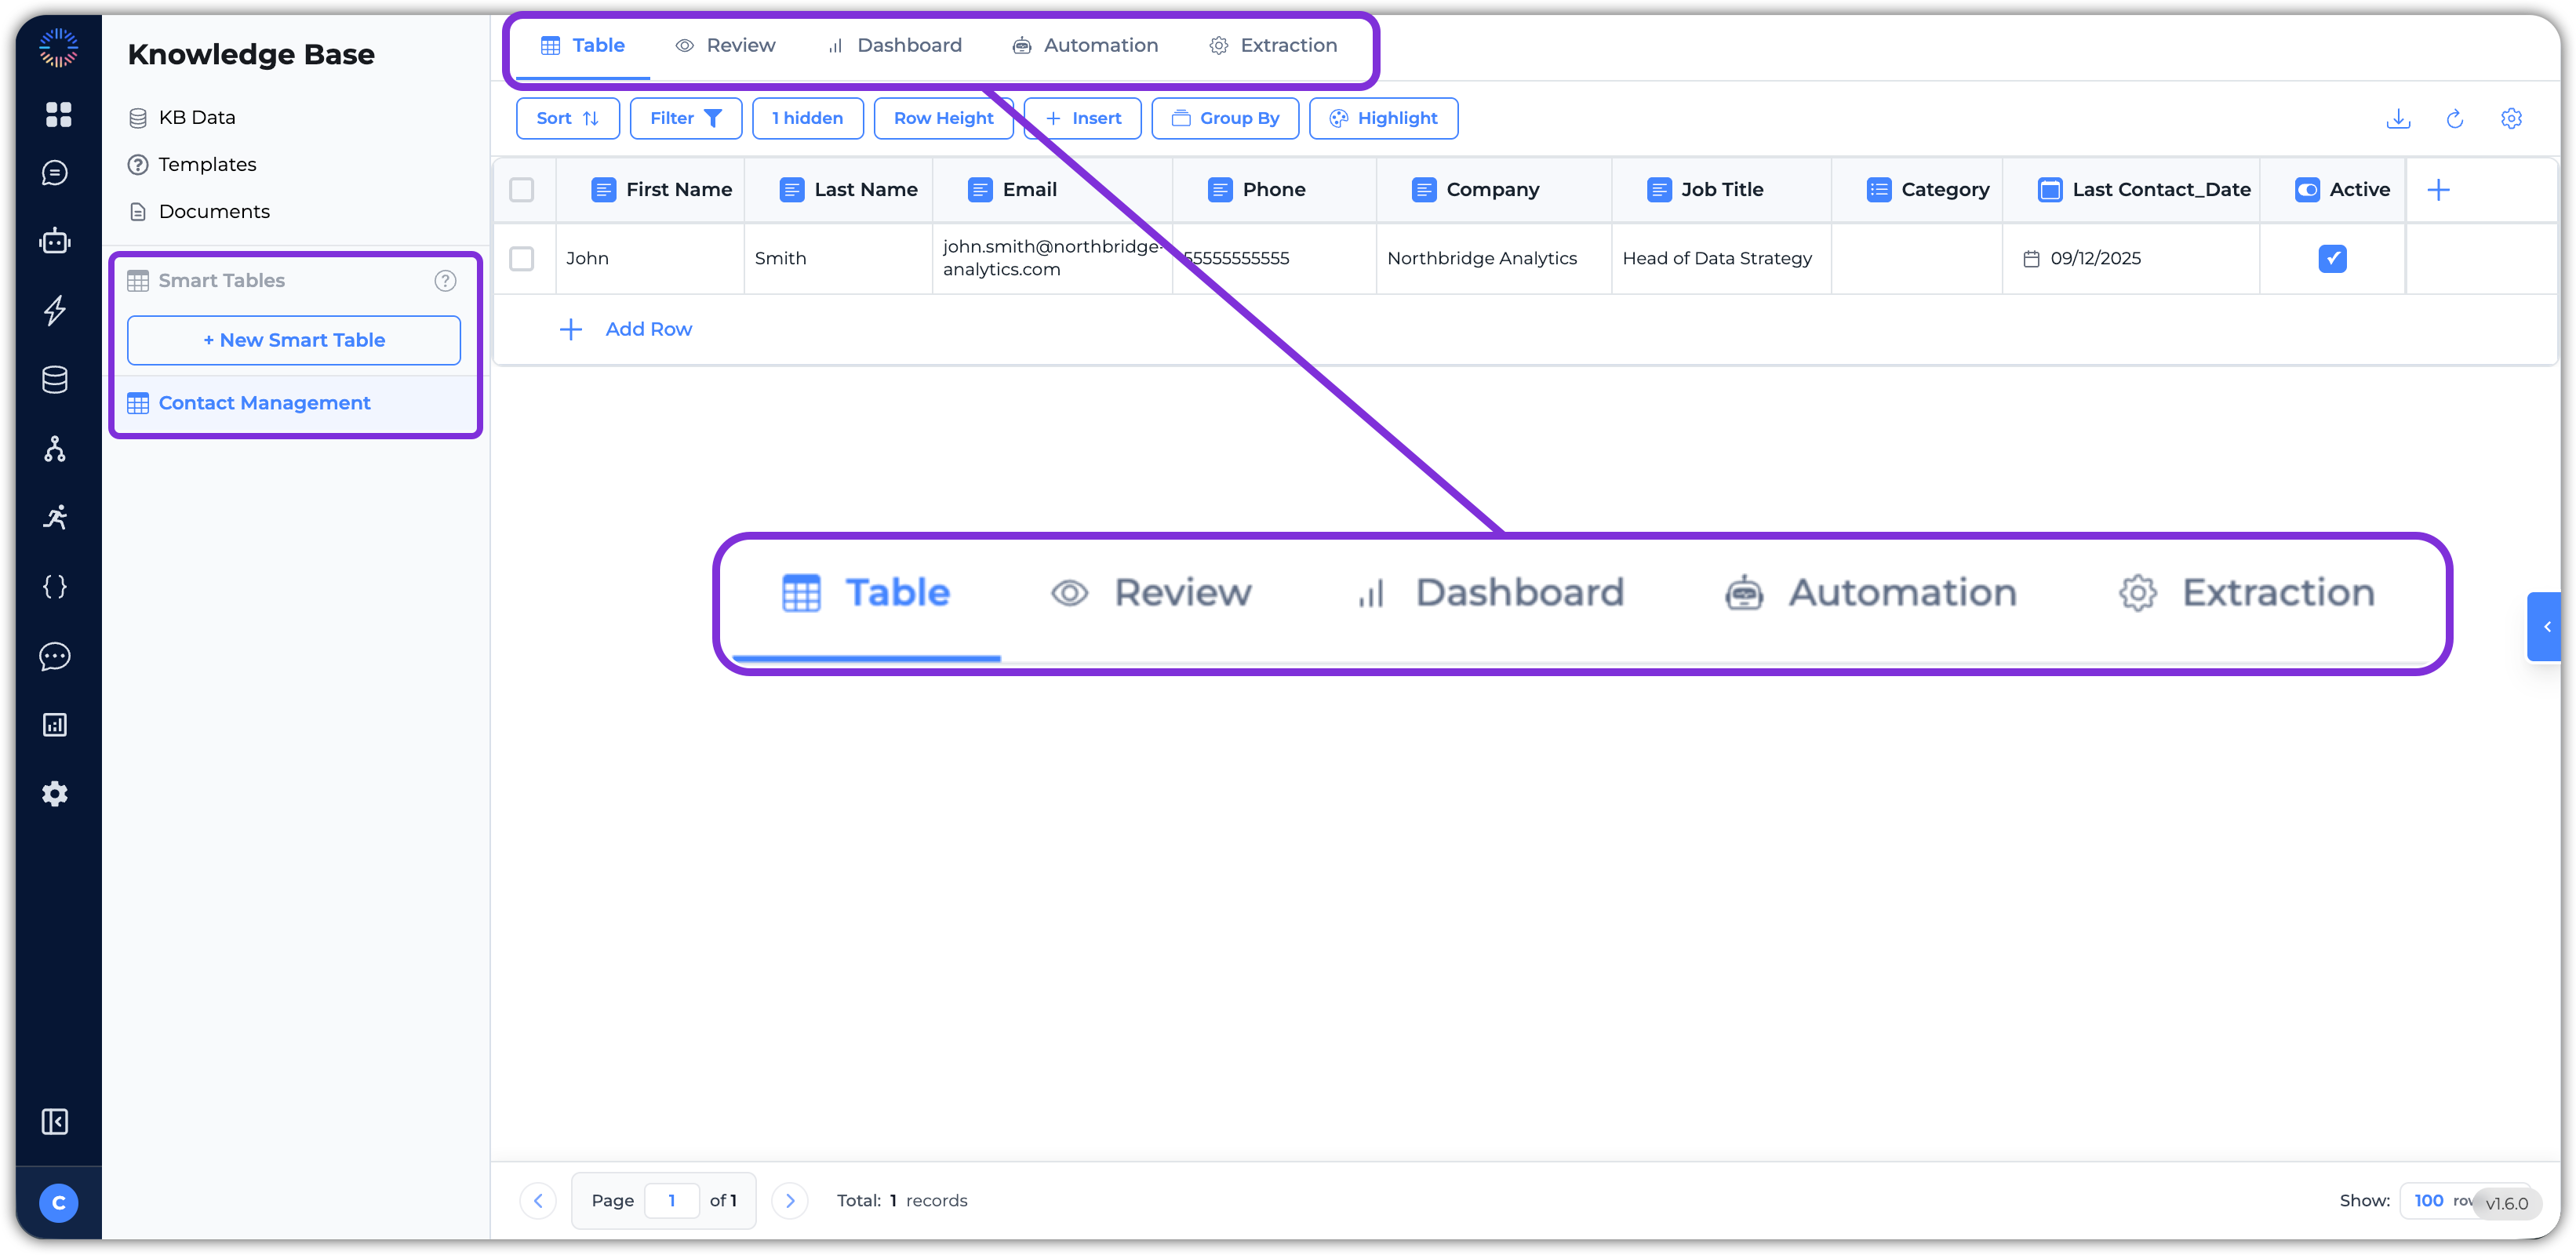
- Navigation – On the left hand side, we have the + New Smart Table button and the list of Smart Tables you’ve created before. If you hover over the button, it will show a few options to create a new table:
- Create Empty Table
- Import from File
- Create from Template
- Table tab – This is the main page where you can see all the data in your Smart Table with a spreadsheet-style view. Here you can see all your rows and fields clearly; ideal for organizing and editing data directly.
- Review tab – This view is designed for the human-in-the-loop process, which is useful when validating or moderating extracted data before approval.
- Dashboard – Here you can create a dashboard to visualize your data with charts, counts, and statistics.
- Automation – In Smart Tables, you can create columns with a task to calculate a value or even use an AI agent or LLM to perform an evaluation or find information based on the information in your table. The Automations tab is where you configure column execution order and history tracking for automated computations of those columns.
- Extraction – This tab is the powerhouse for AI-driven document extraction. Here you can configure what data to pull, map it to your table columns, and configure how the data is extracted.
Document Viewing Interface
When you click on a document in the Knowledge Base, it opens the document viewing interface. Here, you can read and manage the document’s metadata and related information. The interface is divided into two main sections: the document content area and the metadata sidebar.
- Document Content Area: This is where the main content of the document is displayed. At the top of the screen, there’s buttons to copy the file name or download the file. There are three tabs in this area:
a. View: Displays the content of the file as uploaded.
b. Content: Displays the text content extracted from the file. This is the content that the AI agent will use for retrieval and answering questions.
c. Chunks: Displays the individual chunks of text created based on the chunking strategy configured in the Knowledge Base settings. Each chunk is a smaller segment of the document that can be independently retrieved by the AI agent. - Details Sidebar: This sidebar provides additional information and options, including:
d. File Details: Displays information about the file, such as the file name, upload date, upload user, file size, file type, and characters count.
e. Document Data Filter: Allows you to assign a Smart Table to the document for structured data extraction, based on the schema of the Smart Table.
f. Custom Metadata: Allows you to add custom metadata fields to the document for improved document categorization and AI-based retrieval, such as: Author name, Version, Pages, Resolution, Dimensions, Content Creator, Keywords, or any other relevant information.
g. Access Tags: Allows you to add access tags to the document to control who can view or interact with the document. You can create new tags from the Super Admin Dashboard. - Associated Questions: The Associated Questions tab allows you to add related commonly asked questions that can be answered by the content of the document. This helps improve the AI agent’s ability to provide accurate and relevant answers based on the document’s content.
Troubleshooting
This section covers common issues users encounter with the Knowledge Base and Level 1 (L1) diagnostic steps to help identify and resolve them.Knowledge Base Not Updating
Symptoms:- New documents uploaded but not appearing in search results
- Changes to existing documents not reflected in AI responses
- Connector data not syncing
-
Check Sync Status
- Navigate to Settings > Sync & Schedule
- Verify if automatic sync is enabled and check the last sync timestamp
- Look for any error messages or failed sync attempts
-
Verify Document Processing
- Open the document in the Knowledge Base
- Check the Content tab to ensure text was extracted correctly
- Review the Chunks tab to verify chunking was completed
- Look for processing errors in the document metadata
-
Check Embedding Model Consistency
- Go to Settings > Settings tab
- Verify the embedding model used for indexing matches the one used for querying
- Ensure the embedding model hasn’t been changed after documents were indexed
-
Manual Sync
- Right-click on the document or folder
- Select Sync to manually trigger reprocessing
- Wait for the sync to complete and check if the issue is resolved
-
Review Connector Status
- If using connectors (Google Drive, SharePoint, etc.), check connector status in Settings > Connectors
- Verify authentication is still valid
- Check for any connection errors or rate limit warnings
Search Mismatch
Symptoms:- Search queries not returning relevant documents
- AI agent not finding information that exists in the Knowledge Base
- Incorrect or irrelevant search results
-
Verify Document Content
- Open the document and check the Content tab
- Ensure the text content is accurate and complete
- Check if the document was processed correctly (no extraction errors)
-
Check Chunking Configuration
- Review Settings > Settings > Chunking Strategy
- Verify chunk size and overlap settings are appropriate for your content
- Consider if chunk size is too large (may miss specific information) or too small (may lose context)
-
Review Embedding Model
- Confirm the embedding model in use is suitable for your content type
- Check if the model supports the language of your documents
- Verify embedding model consistency between indexing and querying
-
Test Search Query
- Try different phrasings of the same query
- Use keywords that appear in the document content
- Check if the search works better with exact phrases vs. keywords
-
Check Document Metadata
- Review custom metadata and tags assigned to documents
- Ensure documents are properly categorized and tagged
- Verify access tags aren’t restricting visibility
-
Review Chunks
- Open the Chunks tab for the document
- Verify chunks contain the expected information
- Check if relevant information is split across multiple chunks
Data Not Visible
Symptoms:- Documents not appearing in the Knowledge Base list
- Files uploaded but not showing up
- Connector data not visible after sync
-
Check File Filters
- Review the file type filter at the top of the KB Data page
- Ensure the filter isn’t excluding your document type
- Try clearing all filters to see all documents
-
Verify Upload Status
- Check if the upload completed successfully
- Look for any error messages during upload
- Verify file size and format are supported
-
Review Folder Structure
- Check if documents are in a subfolder
- Navigate through folders to locate the document
- Use the search bar to find the document by name
-
Check Access Permissions
- Verify you have access to view the document
- Check if access tags are restricting visibility
- Ensure you’re logged in with the correct account
-
Review Processing Status
- Documents may still be processing after upload
- Check the document status in the file list
- Wait a few minutes and refresh if processing is in progress
-
Verify Connector Configuration
- If using connectors, check connector settings
- Verify the correct folders/files are selected for sync
- Check if sync schedule is configured correctly
Additional Troubleshooting Tips
- Clear Browser Cache: Sometimes UI issues can be resolved by clearing browser cache
- Check Browser Console: Open browser developer tools (F12) and check for JavaScript errors
- Verify Network Connection: Ensure stable internet connection for sync operations
- Review System Logs: Check Odin AI system logs for any backend errors (requires admin access)
- Contact Support: If issues persist after L1 diagnostics, contact support@getodin.ai with:
- Description of the issue
- Steps taken to diagnose
- Screenshots of error messages
- Document/file names affected