> ## Documentation Index
> Fetch the complete documentation index at: https://learn.getodin.ai/llms.txt
> Use this file to discover all available pages before exploring further.
# Workflow Builder v2
> Create automations from user inputs, file uploads, emails, or on a schedule.
Odin AI v1.7.0 introduces the v2 Workflow Builder, formerly known as Workflows in the Odin AI interface. The Workflow Builder, in Tools, enables you to build the same type of workflows through an updated interface that is more intuitive and easy to use. Workflows that were created prior to this release will still work without any modifications. A future release will enable you to migrate your v1 workflows to this new v2 layout.
## Using The v2 Workflow Builder
1. Login to your account on Odin AI.
2. Select an existing Project or start a new one.
3. Select Tools from the navigation menu on the left.
4. Select the “+ Create Tool” button.
5. Select the “Add Trigger” block to add a trigger that will start your workflow.
* **Manual Input:** Start based on something the user inputs into the chat.
* **File Upload:** Start when the user uploads a file.
* **Schedule:** Start based on a schedule you set.
* **Email:** Start after an email has been received.
6. Select the Trigger icon to update its properties, such as the Manual Input needed.
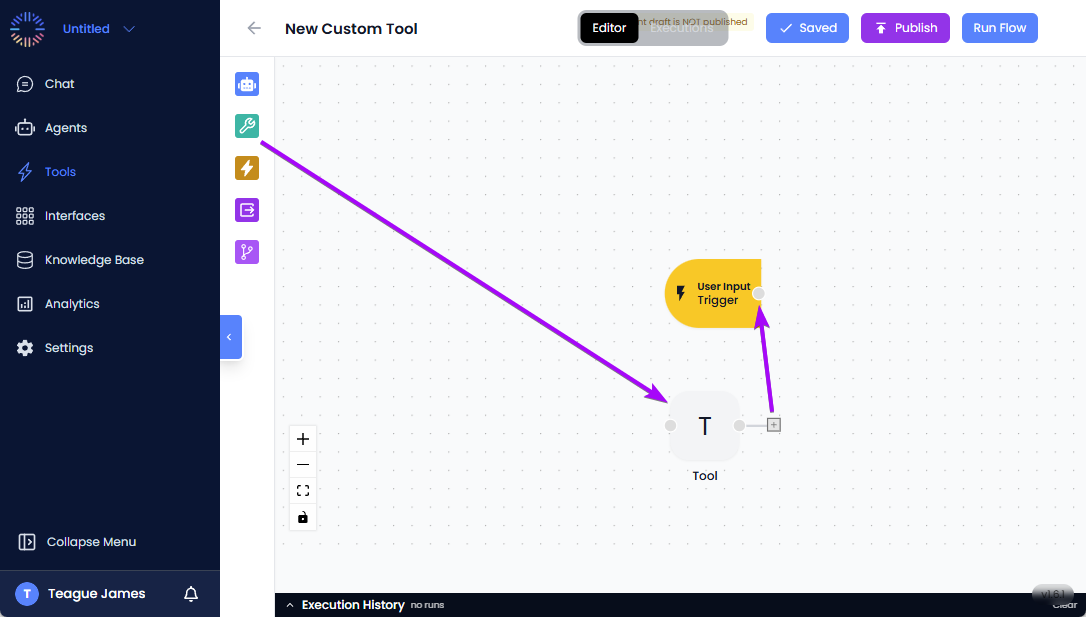
7. From the Custom Tool Menu, drag-and-drop an Agent, Tool, Trigger, Final Output, or Condition onto the Workflow Builder’s page.
8. Drag-and-drop from the \[+] to the dot on the trigger to link the Agent, Tool, Trigger, Condition, or Final Output to your flow.
9. Continue adding components as needed to build your workflow. Select each component to configure it.
10.Use the Run Flow button to test your workflow.
10. When you are ready, use the Publish button to publish your workflow, making it available to the system and members of the Project.
## Passing Data
There are many different scenarios where you can pass data from one step to another. Here is a typical example that you can apply in this or other scenarios.
1. Using the steps above, create a Manual Input of a person's name.
* Select the Trigger.
* Select User Input for the Trigger Mode.
* Enter a name for the input, in this example we used 'name'.
2. Drag a Tool (green wrench icon) near the trigger.
3. Connect the Trigger to the Tool by dragging from the Trigger's connection dot on the right to the Tool on the left.
4. Select the Tool, then select Web Search from the Add Node menu that appears on the right.
5. Select Google Search.
6. Enter your query using the '@' symbol to call the 'name' variable's data.
* Select the name variable.
This same method is used to pass information from one component to another in the Tool's Workflow.
## Debugging Runs
Tool workflows that have been run are logged in the Executions list. There you can access all of the steps and results from each step for a particular execution.
1. In a Tools Workflow you have already run, select the **Executions** switch at the top of the page.
2. Select the particular run you want to evaluate from the list that appears on the left.
3. Select individual steps to see what data was passed and what the result was for that step.
Following these steps will allow you to identify the root cause of your Tool's execution failure, enabling you to take steps to remedy the issue.
## Version History
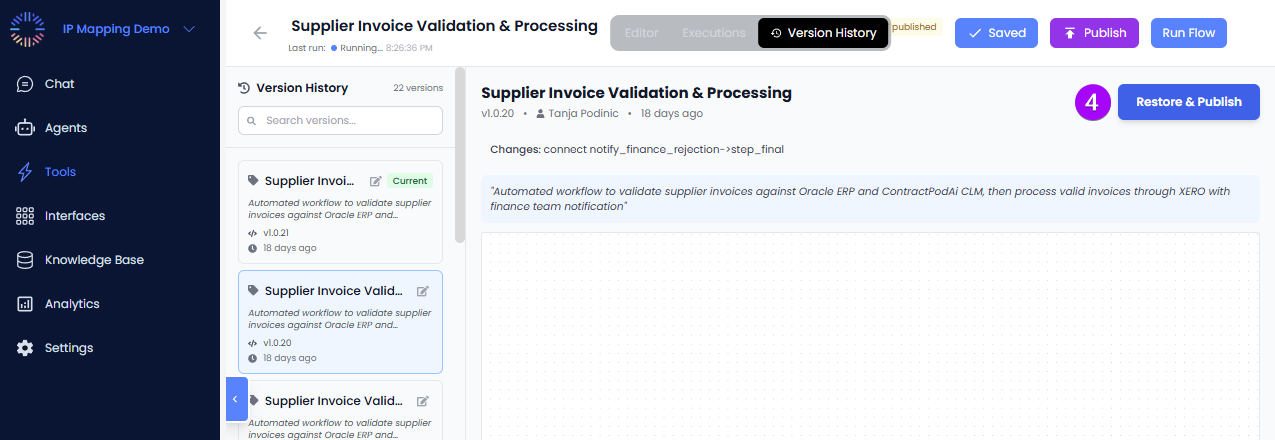
1. In a Tools Workflow you have already run, select the **Version History** switch at the top of the page.
2. By default, the Current Version is displayed.
3. Previous versions can be selected from the list below the Current Version.
4. After a prior version has been selected, use the **Restore & Publish** button to revert to the previous version.
 9. Continue adding components as needed to build your workflow. Select each component to configure it.
10.Use the Run Flow button to test your workflow.
10. When you are ready, use the Publish button to publish your workflow, making it available to the system and members of the Project.
## Passing Data
There are many different scenarios where you can pass data from one step to another. Here is a typical example that you can apply in this or other scenarios.
1. Using the steps above, create a Manual Input of a person's name.
* Select the Trigger.
* Select User Input for the Trigger Mode.
* Enter a name for the input, in this example we used 'name'.
9. Continue adding components as needed to build your workflow. Select each component to configure it.
10.Use the Run Flow button to test your workflow.
10. When you are ready, use the Publish button to publish your workflow, making it available to the system and members of the Project.
## Passing Data
There are many different scenarios where you can pass data from one step to another. Here is a typical example that you can apply in this or other scenarios.
1. Using the steps above, create a Manual Input of a person's name.
* Select the Trigger.
* Select User Input for the Trigger Mode.
* Enter a name for the input, in this example we used 'name'. 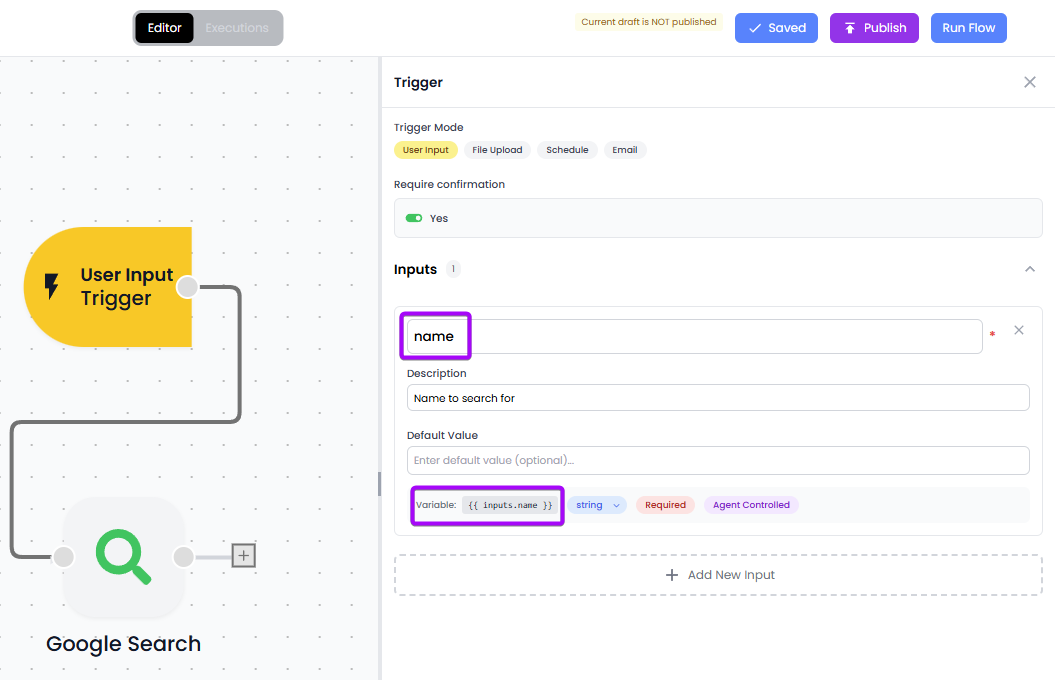 2. Drag a Tool (green wrench icon) near the trigger.
3. Connect the Trigger to the Tool by dragging from the Trigger's connection dot on the right to the Tool on the left.
4. Select the Tool, then select Web Search from the Add Node menu that appears on the right.
2. Drag a Tool (green wrench icon) near the trigger.
3. Connect the Trigger to the Tool by dragging from the Trigger's connection dot on the right to the Tool on the left.
4. Select the Tool, then select Web Search from the Add Node menu that appears on the right. 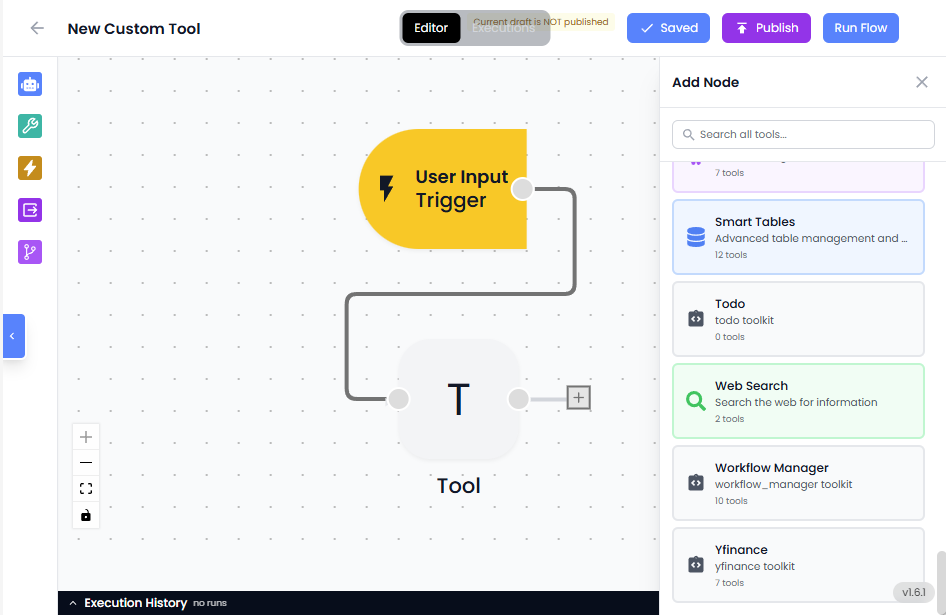 5. Select Google Search.
6. Enter your query using the '@' symbol to call the 'name' variable's data.
* Select the name variable.
5. Select Google Search.
6. Enter your query using the '@' symbol to call the 'name' variable's data.
* Select the name variable.  This same method is used to pass information from one component to another in the Tool's Workflow.
## Debugging Runs
Tool workflows that have been run are logged in the Executions list. There you can access all of the steps and results from each step for a particular execution.
1. In a Tools Workflow you have already run, select the **Executions** switch at the top of the page.
2. Select the particular run you want to evaluate from the list that appears on the left.
3. Select individual steps to see what data was passed and what the result was for that step.
Following these steps will allow you to identify the root cause of your Tool's execution failure, enabling you to take steps to remedy the issue.
## Version History
1. In a Tools Workflow you have already run, select the **Version History** switch at the top of the page.
2. By default, the Current Version is displayed.
3. Previous versions can be selected from the list below the Current Version.
This same method is used to pass information from one component to another in the Tool's Workflow.
## Debugging Runs
Tool workflows that have been run are logged in the Executions list. There you can access all of the steps and results from each step for a particular execution.
1. In a Tools Workflow you have already run, select the **Executions** switch at the top of the page.
2. Select the particular run you want to evaluate from the list that appears on the left.
3. Select individual steps to see what data was passed and what the result was for that step.
Following these steps will allow you to identify the root cause of your Tool's execution failure, enabling you to take steps to remedy the issue.
## Version History
1. In a Tools Workflow you have already run, select the **Version History** switch at the top of the page.
2. By default, the Current Version is displayed.
3. Previous versions can be selected from the list below the Current Version.
 4. After a prior version has been selected, use the **Restore & Publish** button to revert to the previous version.